With the Assessment Platform’s Policy Generator, you’ll have curated custom policies with some auto-populated information from your assessment data, as well as a generic collection of policies made available to you. Important organization/assessment-specific data will be outlined in red, so you’ll have the ability to modify to your liking with ease.
Locating the Policy Generator
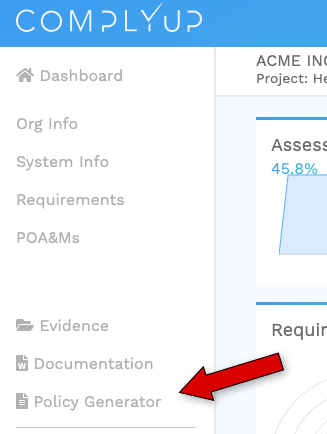
The Policy Generator can be located to the left of the Assessment Dashboard just underneath Documentation.
Policy Generator Dashboard
Upon clicking the Policy Generator link, you’ll be taken to the Policy Generator Dashboard.
You’ll immediately see a large text area and a collection of available policies to the right. The text area, until a policy is selected, has no functionality.
Above the available policies, you’ll see some assessment specific information, as well as some information on how to properly use the Policy Generator.
These policy examples can be used as a guide as you develop your own corporate policies. Add pertinent information for your organization and remove information that is not applicable.
Be sure you can fully enforce and execute the policy statements within a policy before assigning it as evidence. You are responsible for ensuring your organization adheres to the policies you choose to use as evidence.
Making Changes to a Policy
Once you select a template from the side panel, you’ll see that policy template populate the text area. A new option menu will appear to the right of the text area.
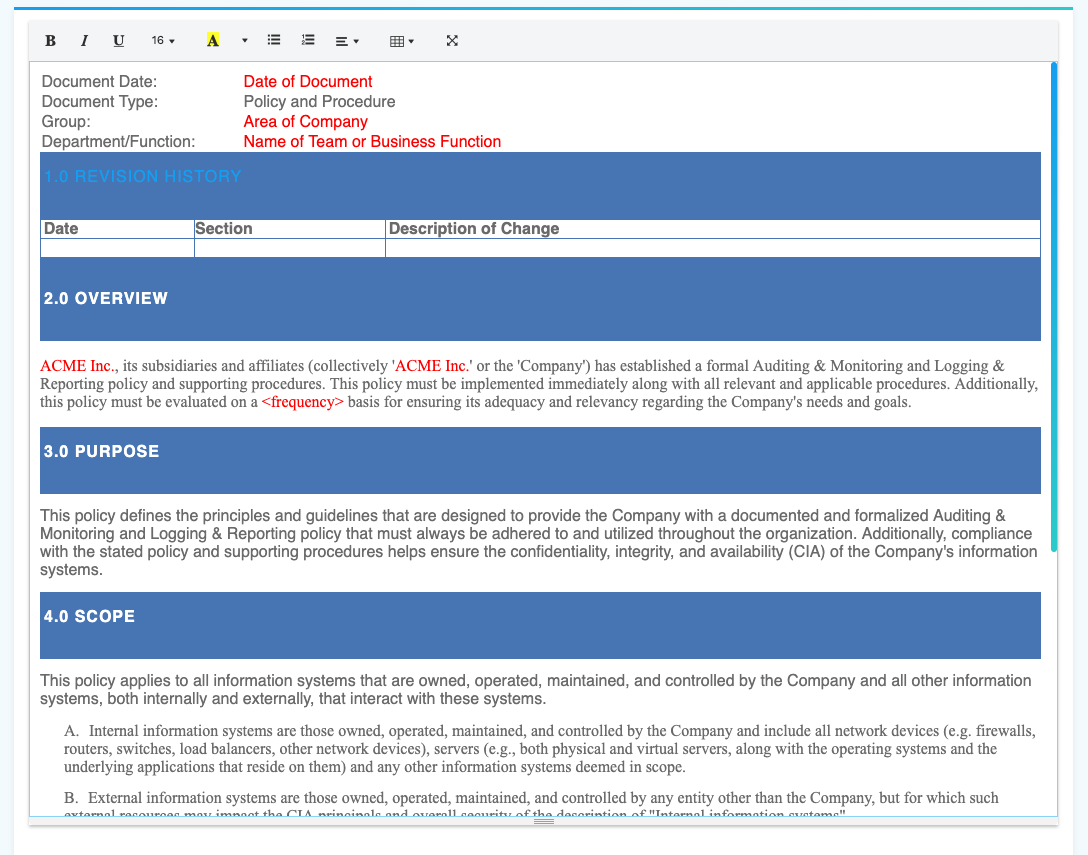
The text area will populate with the policy template.
You’ll see the general policy text as gray. The text in red is text that should be modified to fit your organization’s standards. Sometimes, you’ll see that there has already been populated data (shown in red) to reflect data that has been auto-populated. You should verify this information to be true.
Ex. In the policy template below, you can see that some red text has been auto-populated (ACME Inc.) and some has yet to be filled in (<frequency>).
While the Assessment Platform will try to populate as much data as possible, it is still important to review your policies before finalizing.
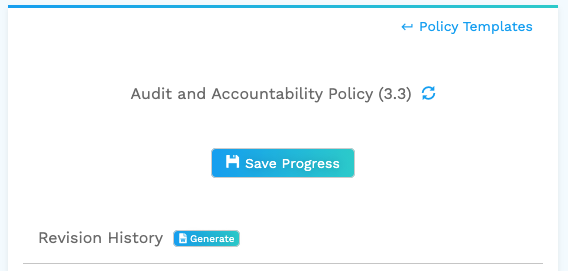
On the right-hand options menu, there are four possible options.
Return to Policy Templates – The top-most link, an arrow next to “Policy Templates”, will reopen the policy list.
If you select a different policy, the policy in the text field will not yet be changed, you’ll only be looking at the option menu for the policy you selected.
Reload – The reload button to the right of the policy name will either reload the current policy template in the text area with the policy selected from the options menu. If it’s the same policy, it will refresh it to the most recent save point.
If you reload without saving, all progress made on the current policy will be lost.
Save Progress – Use this button to constantly save your progress as you move through each policy template.
Be sure to constantly save, as this is one area of the Assessment Platform that does not Autosave.
Generate – The most important link is the Generate button. This creates a new version of the policy that is saved and can then be associated as evidence. You’ll see a history of generated policies below the options menu once you’ve generated your first policy.