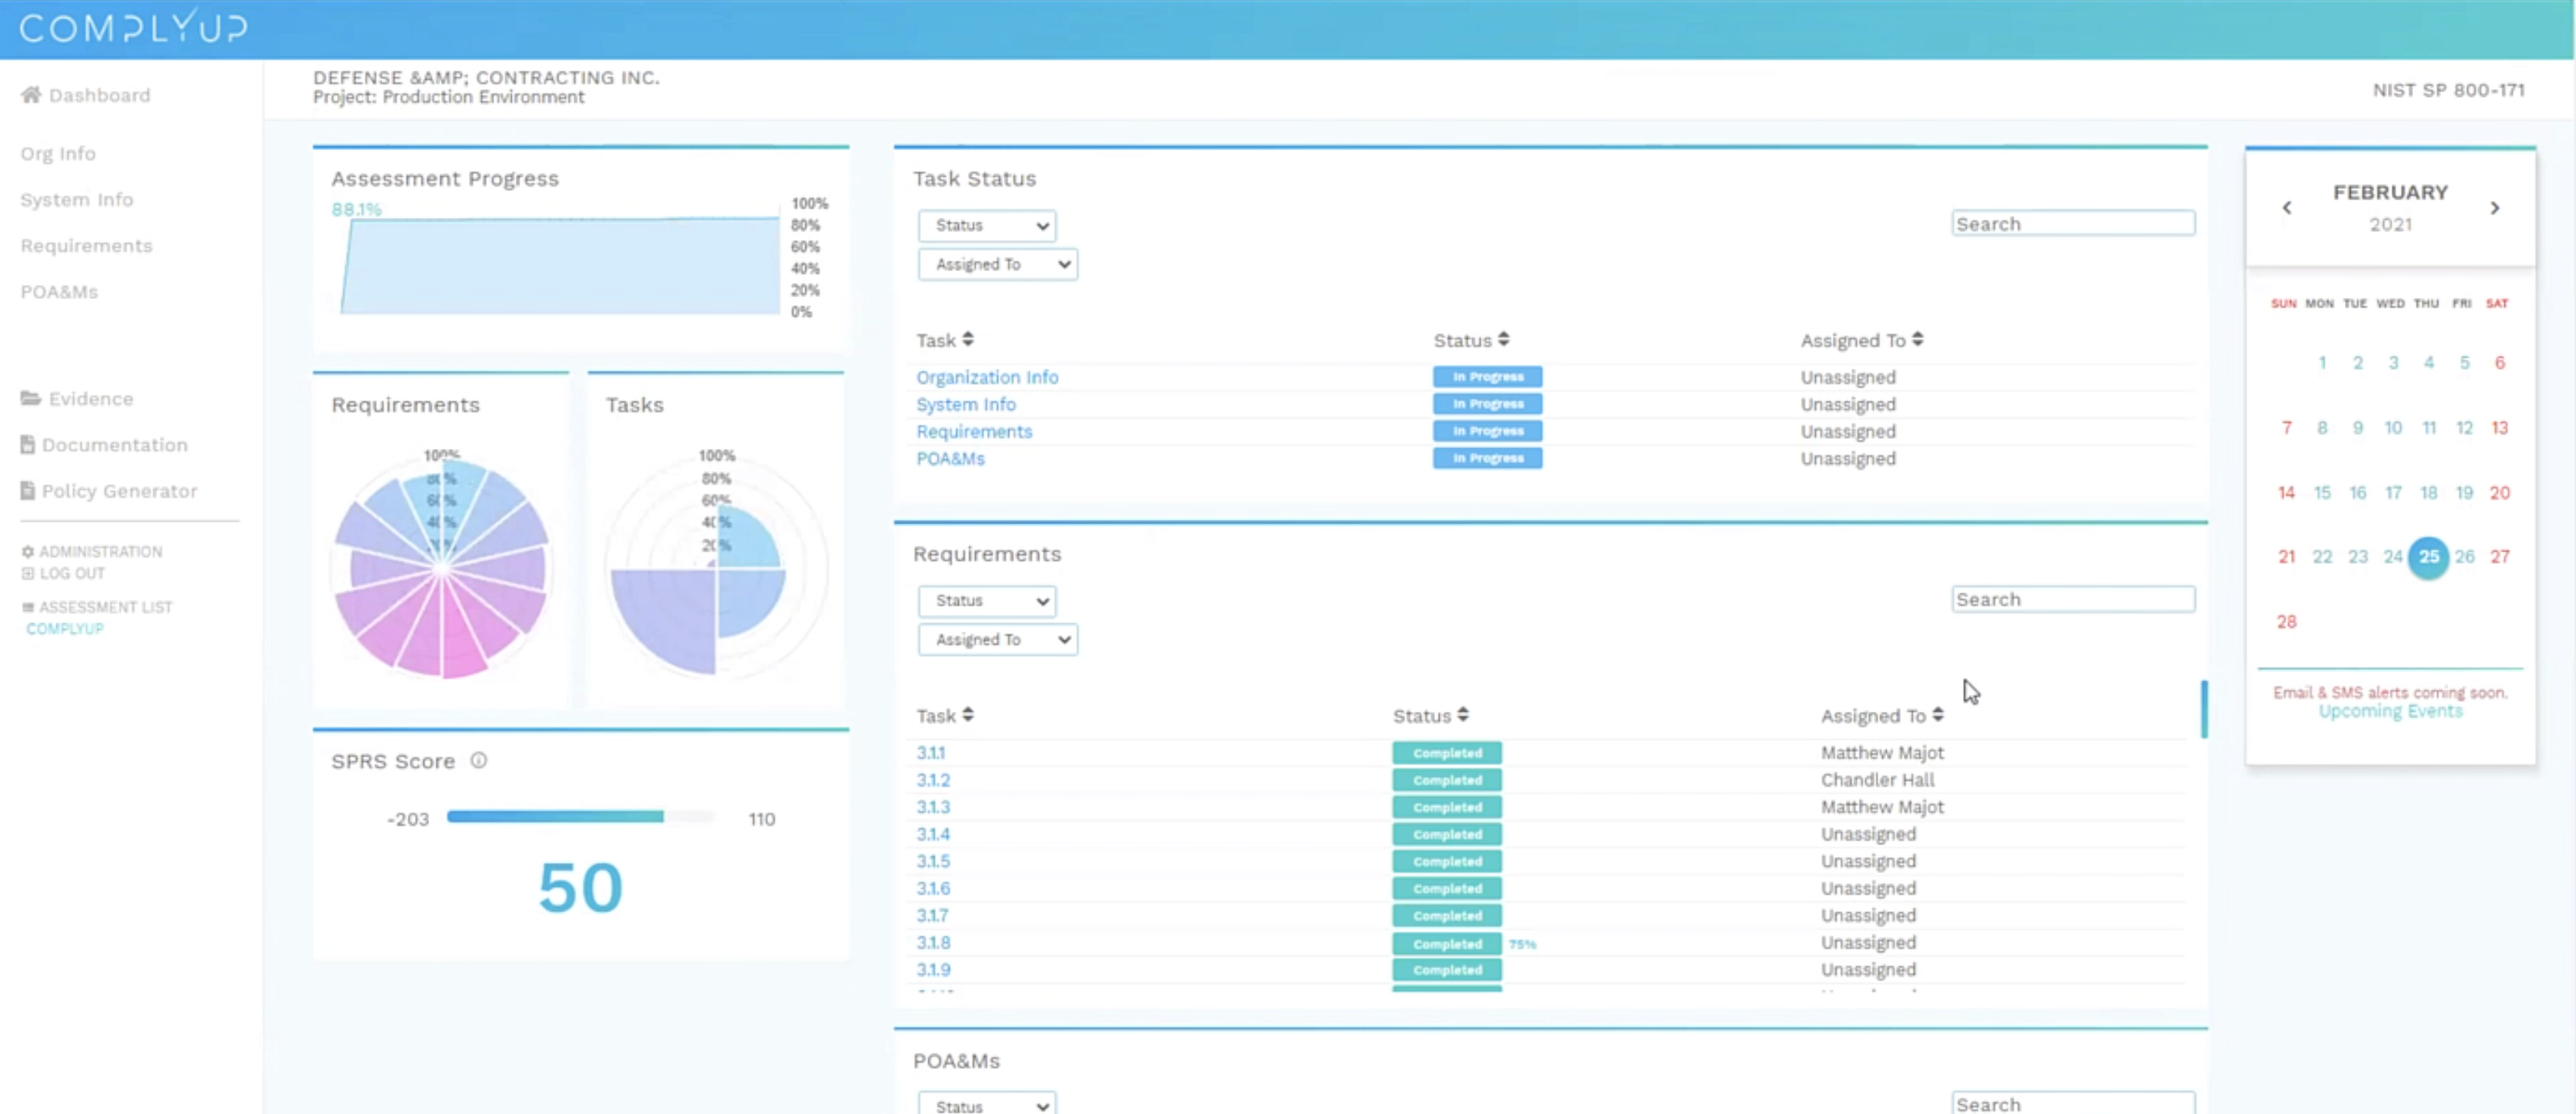
Assessment Dashboard
In the Assessment Dashboard, there are many panels to help you navigate your assessment and track your progress.
- Assessment Progress – Visually track your assessment progress from start to finish with an overall percentage completion indicator.
- Requirements pie chart – See the individual progress of requirements. Hover over a slice to see which requirement is being represented.
- Tasks pie chart – See the individual progress of tasks. Hover over a slice to see which task is being represented.
- SPRS Score – Scores are calculated using the “NIST SP 800-171 DoD Assessment Methodology”. Each requirement has an individual score penalty ranging from 1 to 5.
Requirements marked “Implemented” or “Not Applicable” receive no score penalty.
Requirements 3.5.3 and 3.13.11 receive a reduced penalty if marked as “Partially Implemented”.
Requirement 3.12.4 is not included in the score (per the DOD Assessment Methodology).
Additional information regarding SPRS and scoring is available here. - Task Status – Here, you’ll find the status of major components required to complete your assessment (Along with various ways to navigate and sort them). Select the task title to navigate to that task.
- Organization Info
- System Info
- Requirements
- POA&Ms
- Requirements detail – This is where you can find the individual requirements and the bulk of your assessment work. Select the requirement title to navigate to that requirement.
- POA&Ms (Plan of Action) – Similar to the Task Status panel and Requirements panel, the POA&Ms section of your dashboard will show the status off all POA&Ms you’ve created throughout your assessment. Select the POA&M title to navigate to that POA&M.
The navigation menu on the left side of your Assessment Dashboard will help you quickly traverse the different subsections of your assessment.
- Dashboard – Click this at any point to return to your Assessment Dashboard.
- Org Info – You’ll need to fill out standard organization information (such as your organization name, address, and system name) as well as an organization logo and various points of contact.
- System Info – Here you can include data about your information system, leveraged systems, environments of operation, and any necessary diagrams that you have.
- Requirements – The bulk of assessment work will be done within “Requirements”. You’ll see specific practices, processes, and requirements for each part of your assessment. There is a formal description taken from the System Security Plan, and Requirement ID, a section for internal notes (seen only by you and anyone you allow access to your assessment), an implementation input section where you’ll begin filling your assessment data, an evidence collection pane, review progress, and a variety of guidances.
- POA&Ms – Here you have the ability to create, modify, review, and delete any POA&Ms associated with the current assessment.
- Evidence – In the Evidence tab, you’ll find your file library. You can add, delete, review, and download all files uploaded as evidence or policies from here. There are also additional options to show associations (which requirements, practices, etc.) with each file.
- Documentation – You’ll find your generated documentation history here. You can download any file by clicking the title of the document.
- Policy Generator – ComplyUp’s Policy Generator takes the head-ache out of creating policies from scratch. Select which policy you’d like to create from the Policy Templates menu on the right (there are assessment-specific policies as well as a generic collection). From there, enter your data in the text editor and select “Save Progress” on the right. You can also refresh the policy back to its original template format or generate a revision history.
- Administration – In the administration drop down, you’ll have several options to manage your account, assessment, etc.
More information is available in the Administration section below. - Logout – Use this button to logout of the platform.
- Assessment List – Selecting this will navigate you back to your Account Dashboard. From there you can select which assessment you’d like to view.
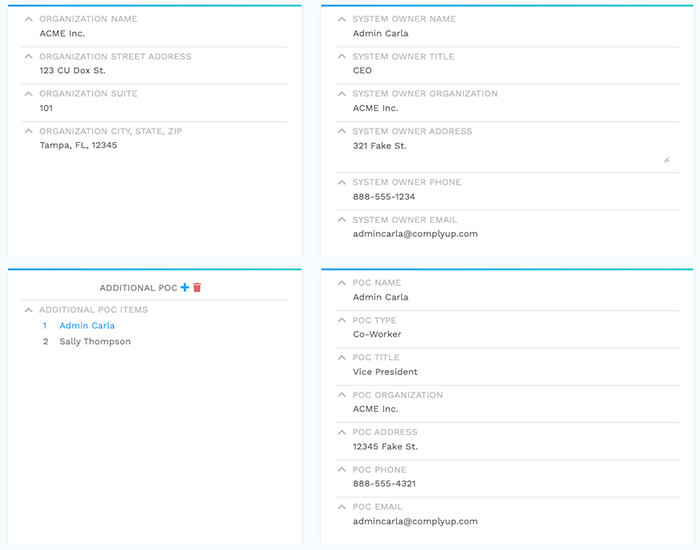
Organization Info
An assessment centers around an organization and one or more systems. Click the Org Info item in the left-hand menu to display the Organization page.
There are several panels on which you can enter information about the organization:
- Organization Name, Street Address, and other address information.
- System Owner Name and other contact information.
- POC (Point of Contact) — POC Name and other contact information.
- Additional POCs — Click the small + button to add more POCs.
- Organization Logo — Click on the circle to display a popup, onto which you can drag your company logo image file. This logo will appear in your reports.
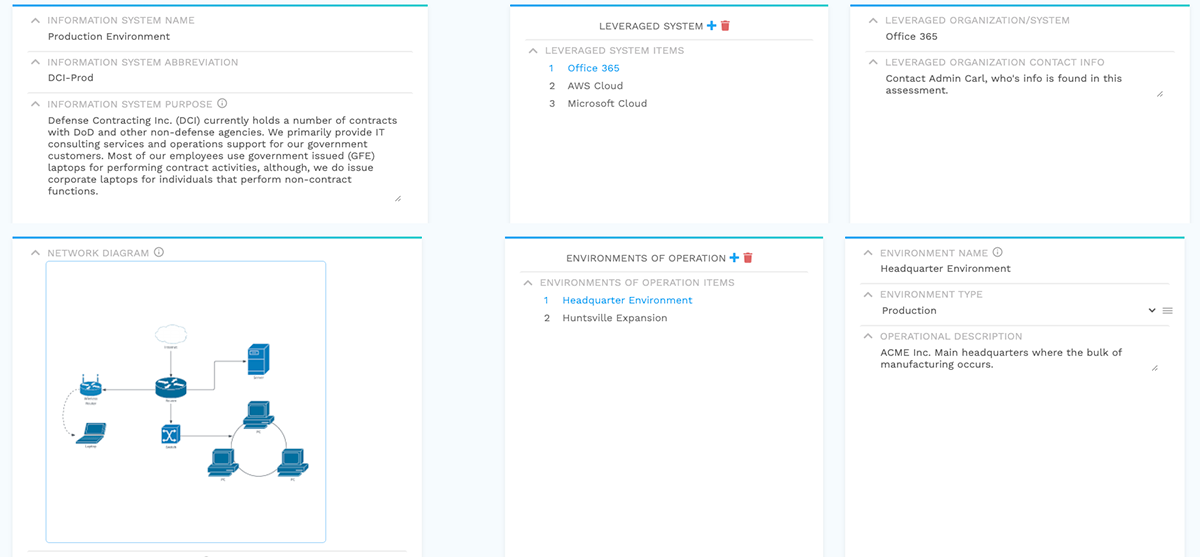
System Info
An assessment centers around an organization and one or more systems. Click the System Info item in the left-hand menu to display the System Information page.
There are several panels on which you can enter information about the system:
- Information System Name, Abbreviation, and Information System Purpose.
- System Owner Name and other contact information.
- Network Diagram — Click on box to display a popup, onto which you can drag the network diagram image file. This diagram will appear in the assessment report.
- System Boundary Diagram — Click on the circle to display a popup, onto which you can drag the system diagram image file. This diagram will appear in the assessment report.
- Leveraged system — click the small + icon to add one or more leveraged systems that interact with the system under assessment (examples include Office 365, AWS Cloud, and Azure). Systems that you enter here can be referred to in the Requirements page.
- Environments of operation — click the small + icon to add one or more environments that are part of the system (examples include development, staging, and production).
- System Interconnections — click the small + icon to add one or more system interconnections (examples includes other networks, ERP systems, or cloud computing environments).
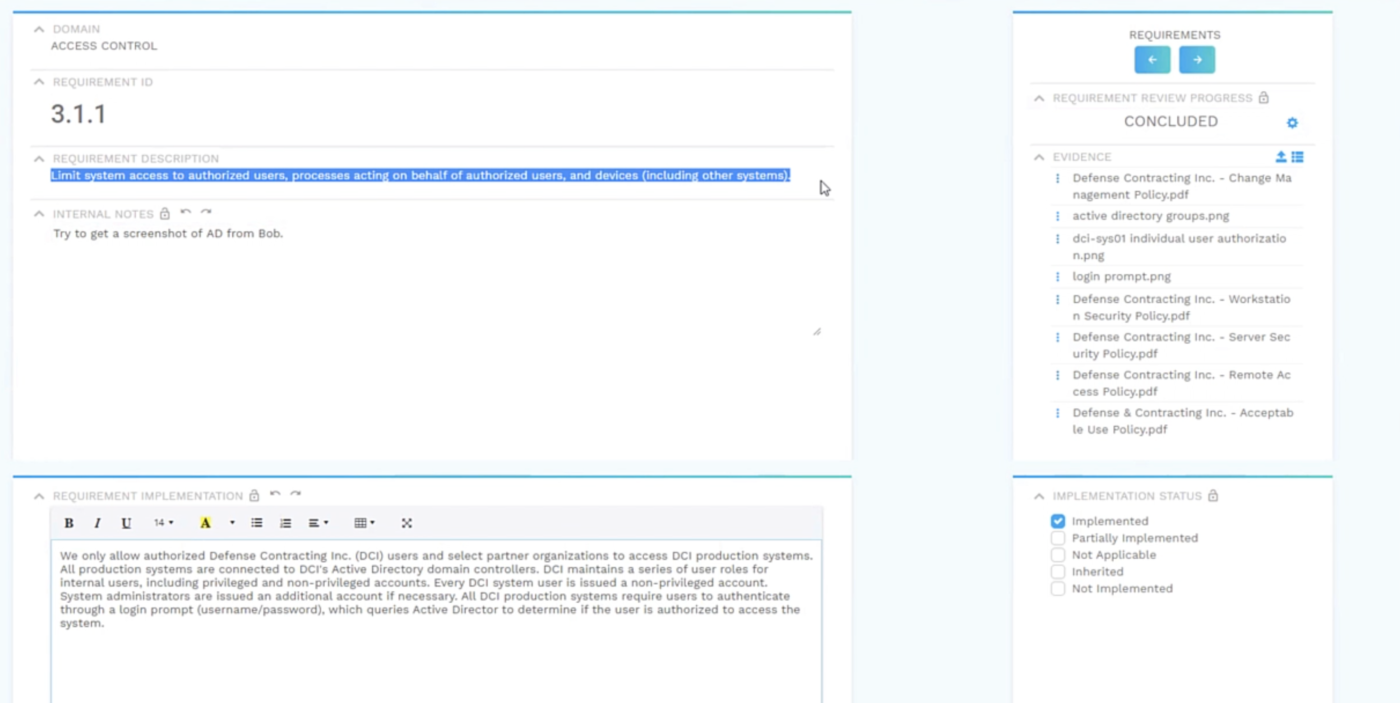
Requirements
An assessment centers around an organization and one or more systems. A system has multiple requirements.
Click the Requirements item in the left-hand menu to display the Requirements page.
There are several panels on which you can enter details for the requirement:
- Domain, Requirement ID (Identifier), Requirement Description, and Internal Notes (which are only seen by the assessment team).
- Requirement Implementation
- Implementation Status — Check one or more boxes that capture the status for this requirement.
- Discussion — Explanation that provides an introduction to the subject matter as it pertains to this particular requirement.
- Guidance — General, categorical indications on organization and system context for this requirement.
- Handbook questions — Questions to prompt the user in preparation to write the response to the Requirement Implementation.
- Requirement review progress — indicates the review stage for this requirement.
- Evidence — click the small + icon to display a popup window onto which you can drag a file the contains evidence for this requirement. Click the small list icon to choose from available evidence that has already been uploaded.
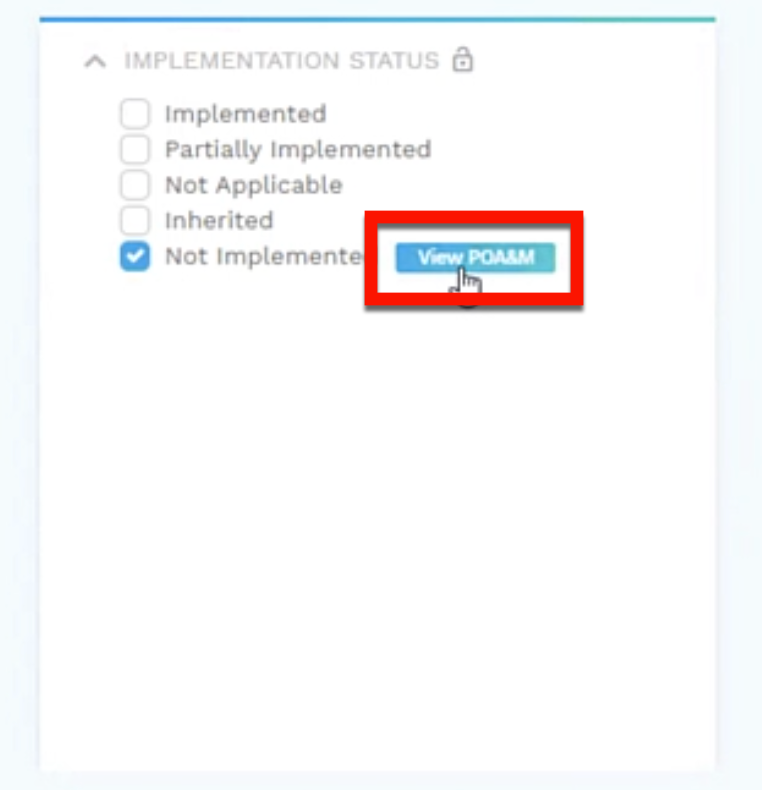
Implementation Status — Not Implemented
In the Implementation Status section, checking the box for Not Implemented will cause a small the Create a POA button or View POA&M button to appear. Click this button to go the POA&Ms page. See the POA&M section below for more information.
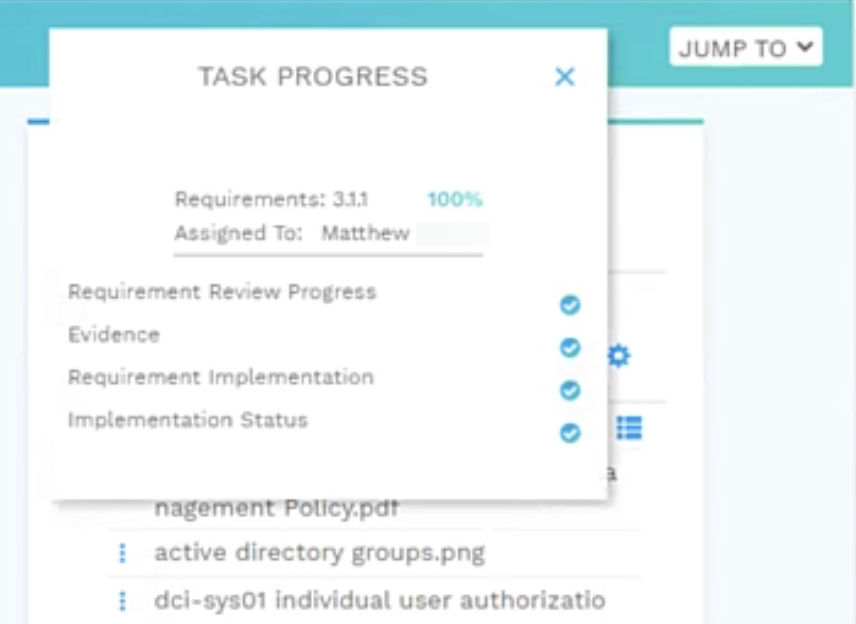
Task Progress
In the top right corner of a Requirements View, click the Task Progress link (the pie chart icon to the right of the percentage of “Task Progress”) to display a popup window that summarizes progress for this requirement.

In the Task Progress View, you’ll see which requirement(s) you’re viewing and the percentage complete next to it. Below shows any users that are assigned to the task. The bulk of information below is what is actually required to gain completion. This consists of the Requirement Review Progress, Evidence, Requirement Implementation, and Implementation Status.
Jump To – Requirements
In the upper-right corner of a Requirements View, click the Jump To button to display a list of other requirements in the assessment.
Select any of these requirements to quickly navigate to that Requirement View for editing, revising, etc.
POA&Ms
A Plan of Action (POA) is created when you have a deficiency. Click the POA&Ms item in the left-hand menu to display the Plan of Action page. Alternatively, this page appears when in the Implementation Status section of the Requirement page if you check the box for Not Implemented and click the View POA&M button.
The panel labeled “POAM” will control the flow of the panels to follow. You’ll see all existing POA&Ms in this panel.
To create a new POA&M, click the blue plus sign.
To delete a POA&M, click the red trash can.
The top 3 panels represent individual POA&Ms. The panels are labeled:
- POA&M
- POA&M Title
- POA&M Progress
The bottom 3 panels represent individual POA&M Milestones. The panels are labeled:
- POA&M: Milestone
- Milestone Title
- Milestone Status
As you navigate POA&Ms and Milestones, you’ll see that the other panels in that row are associated with the specific items you have selected.
For example:
If you select POA&M item #1, the POA&M Title and POA&M Progress will represent only POA&M #1 data.
The same applies to POA&M Milestones with Milestone Title and Milestone Status.
For example:
If you select POA&M item #1, the POA&M Title and POA&M Progress will represent only POA&M #1 data.
The same applies to POA&M Milestones with Milestone Title and Milestone Status.