ComplyUp Assessment Platform Documentation
Version 1.0.0
Say “Goodbye” to your spreadsheets.

ComplyUp’s Assessment Platform (hereafter referred to as “CU-AP”) is a compliance management platform that eliminates the ine fficiencies associated with compliance efforts. For the first time, compliance professionals have complete control over the look, feel and functionality of a compliance tool. The CU-AP allows you to run your entire compliance program from a single interface. Within time, the CU-AP will support most major regulations and standards. Have unique requirements? Facing an obscure regulation? Feed the CU-AP your existing spreadsheets to produce a custom interface and workflow.
It’s everything you need to solve your compliance management headaches.
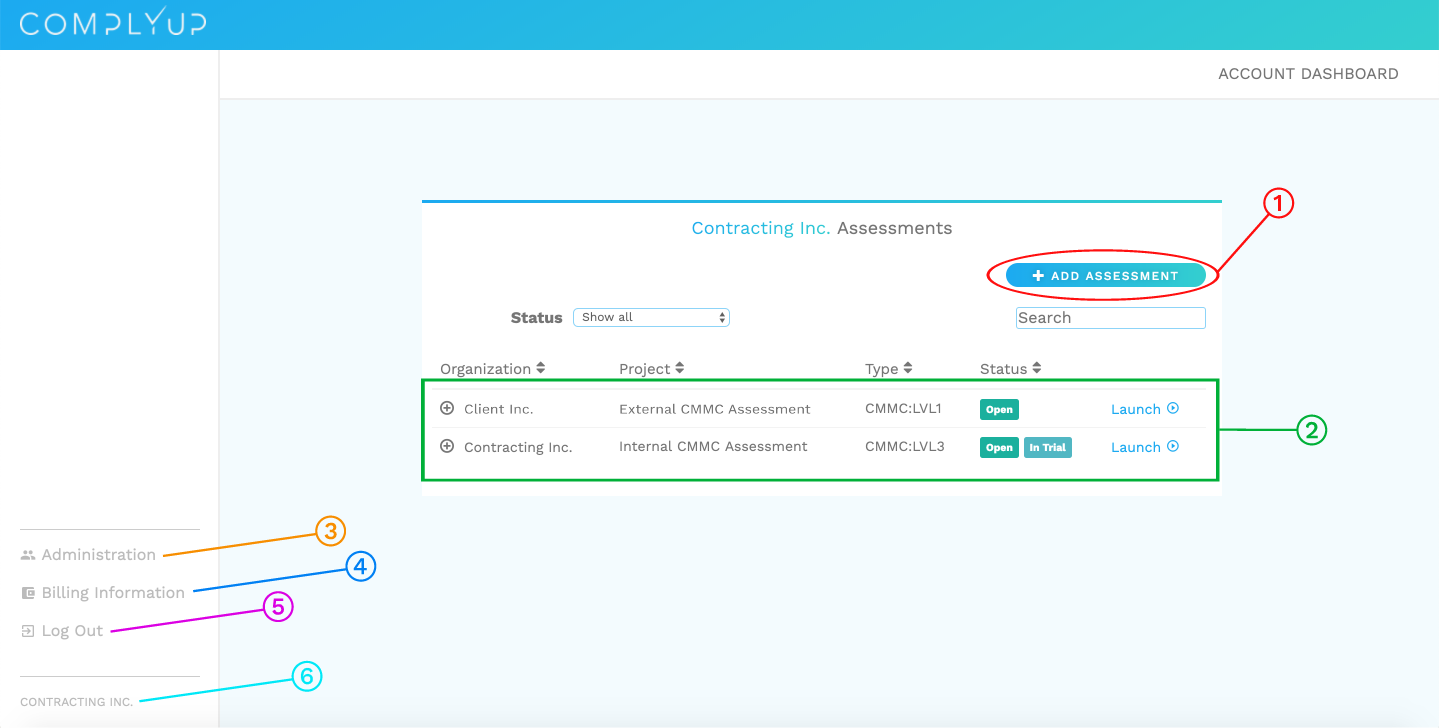
1. Add Assessment
2. Current Licenses
3. Administration View
4. Billing Information Tab
5. Log Out
6. Current Organization
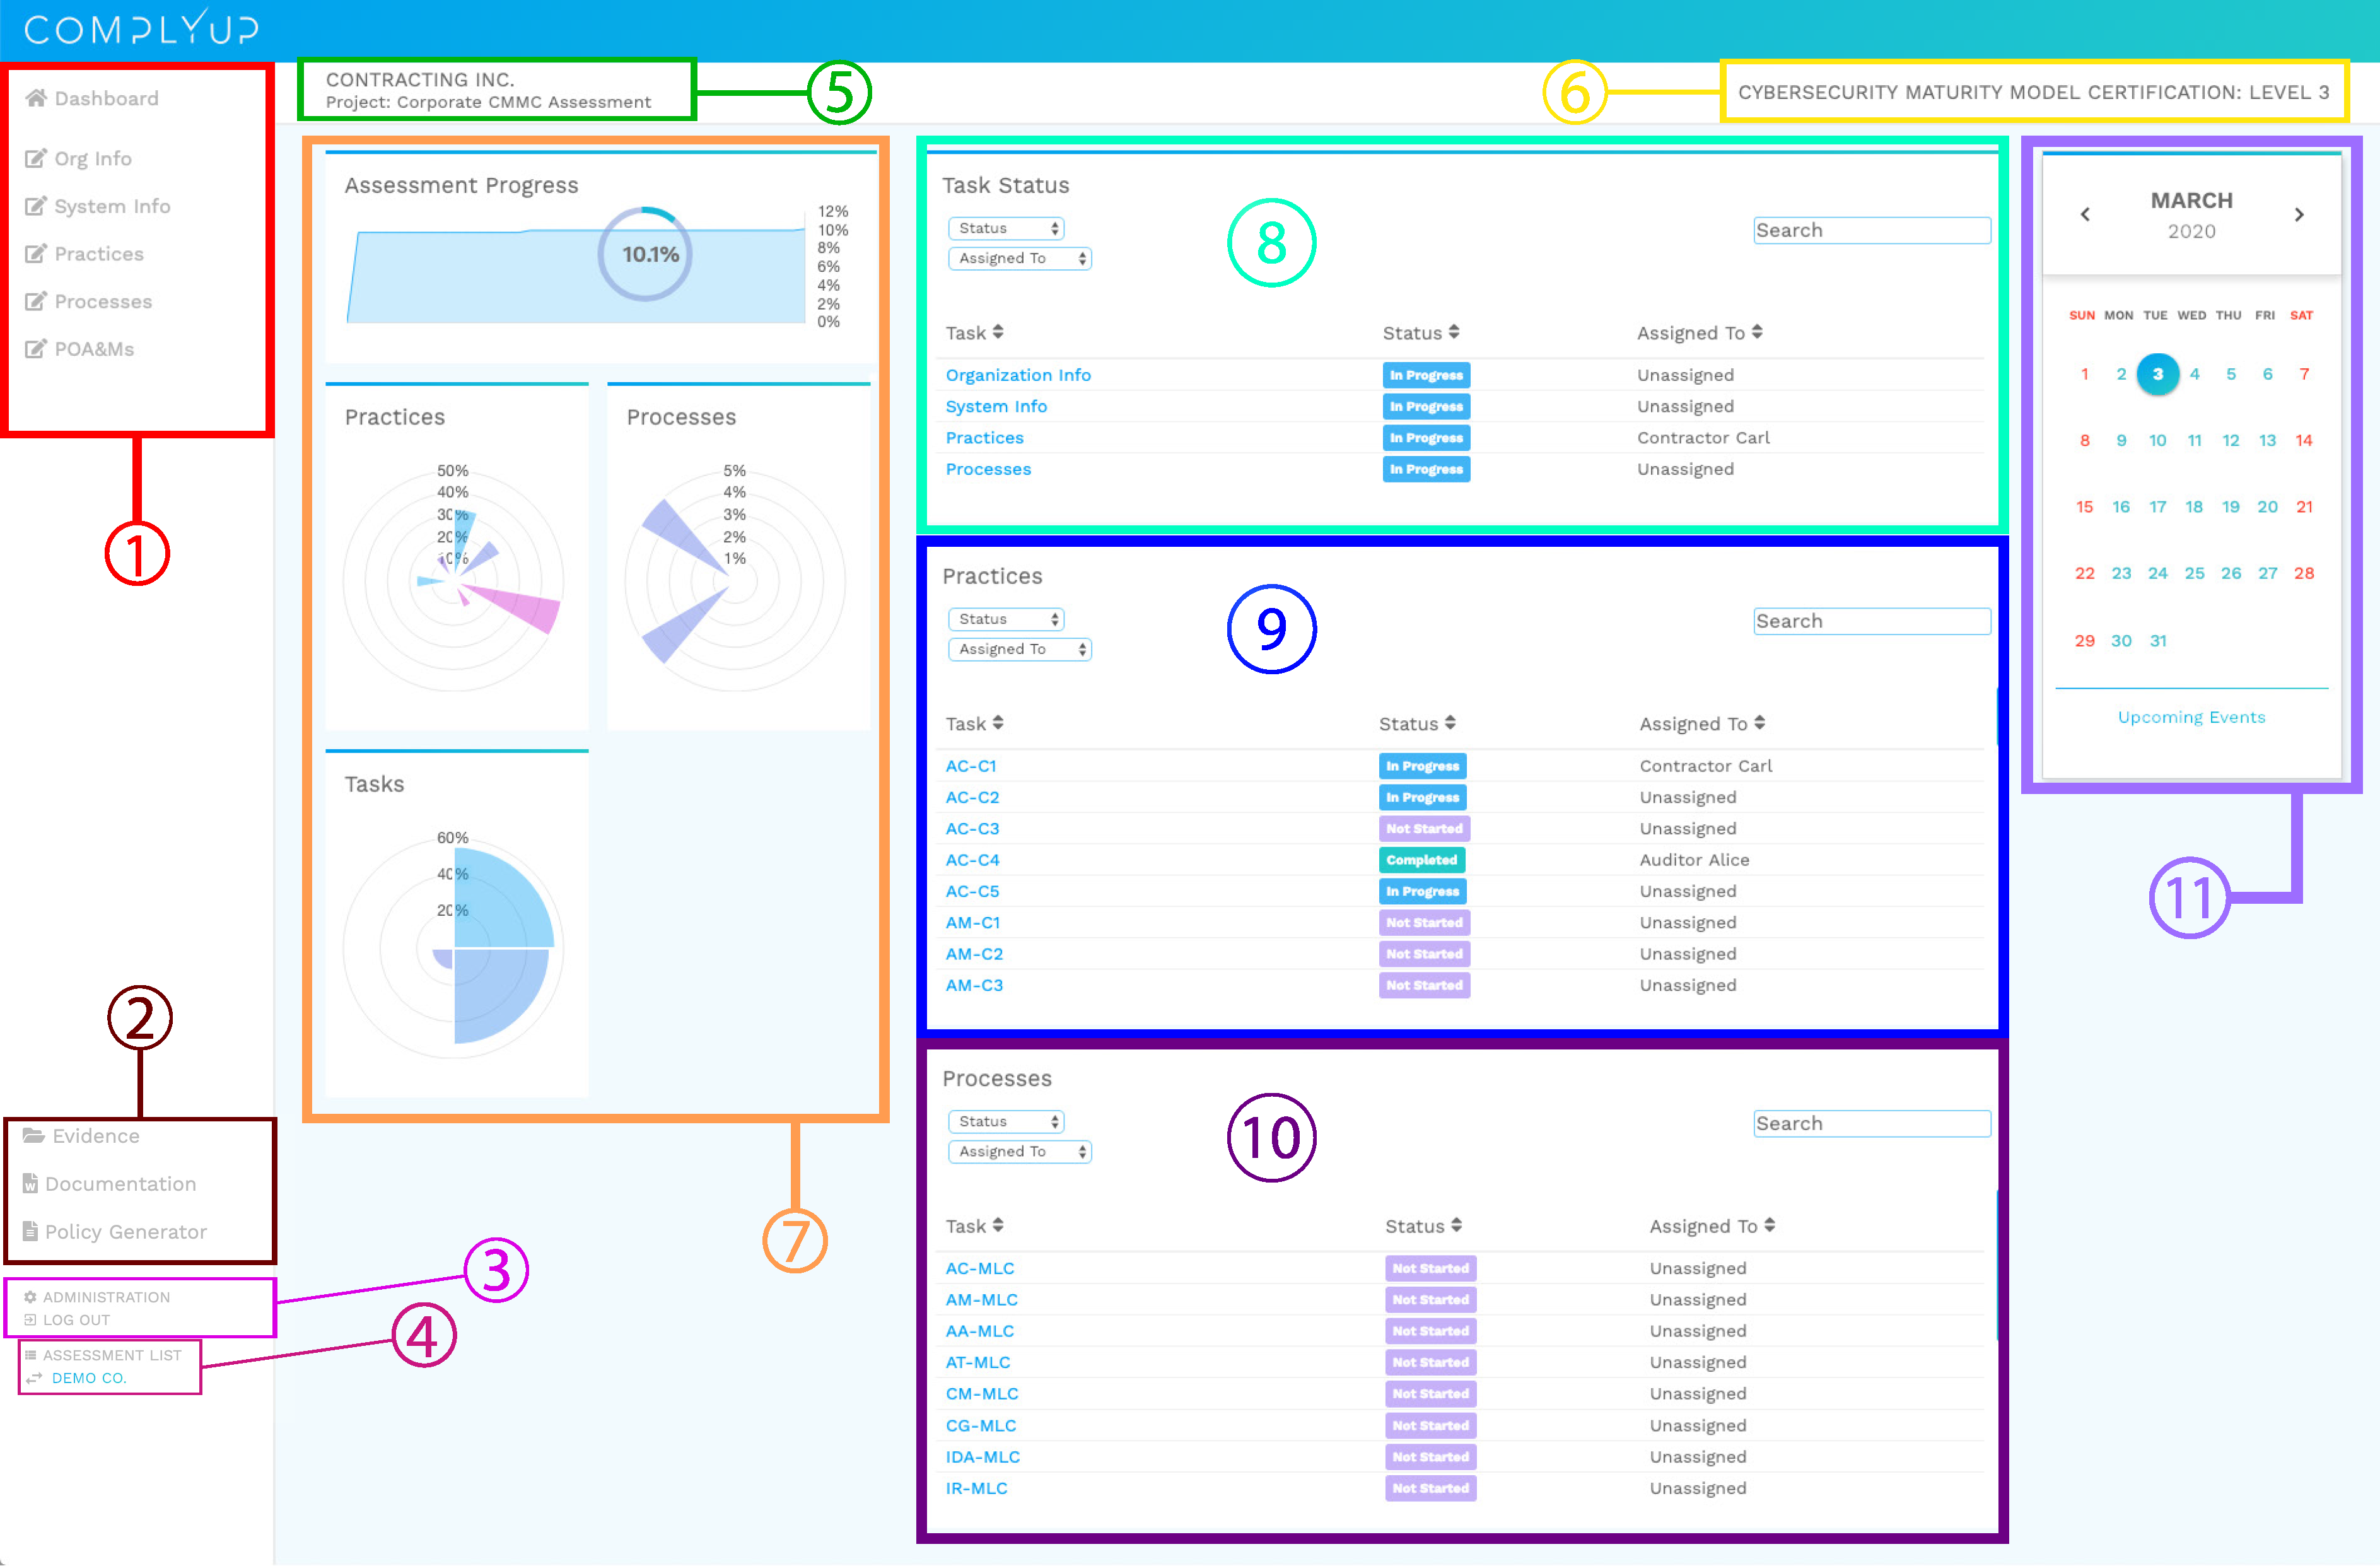
1. Assessment Navigation
2. Assessment Features
3. User Access
4. Current Organization/Organization Dashboard
5. Subject Organization/Project Name
6. License Type
Assessment Specific Controls
7. Visual Progression Graphs
8. Task Status
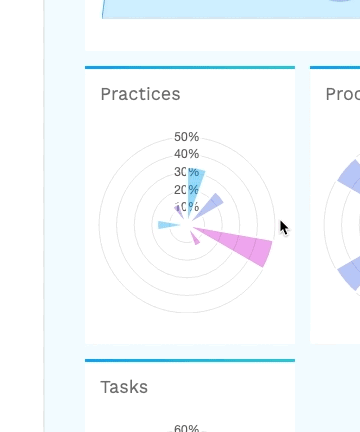
9. Practices
10. Processes
11. Event Calendar
This section will cover Organization Account registration, individual account registration, and inviting others to join your Organization Account.
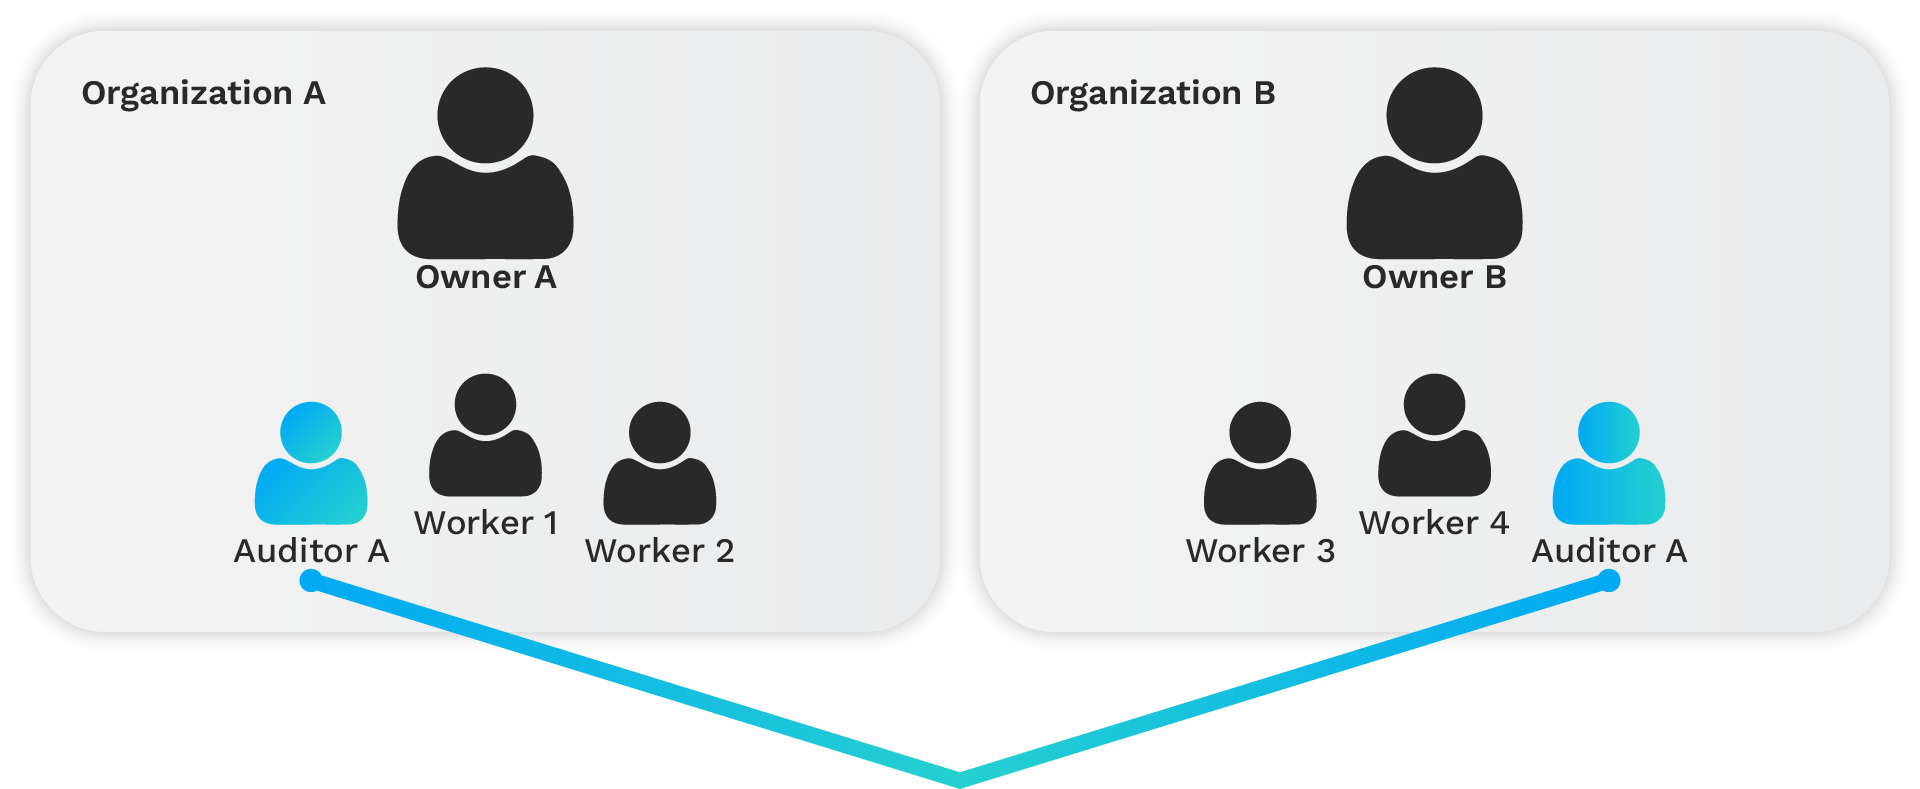
While organization accounts are allowed only 1 user, individual accounts are able to be associated with more than 1 organization account. For example, if Organization A has an account owner and two workers assisting in the assessments on the account and Organization B has a similar situation, they can both use the same auditor who owns an individual account; illustrated below.
You can return at any time to the Assessment List View by selecting a link that will appear directly above Current Organization.
Upon initial sign-up to the CU-AP, you will be prompted to enter your information to create a new account for your organization. If you belong to an already existing organization, see here.
Each organization account can only have one owner.
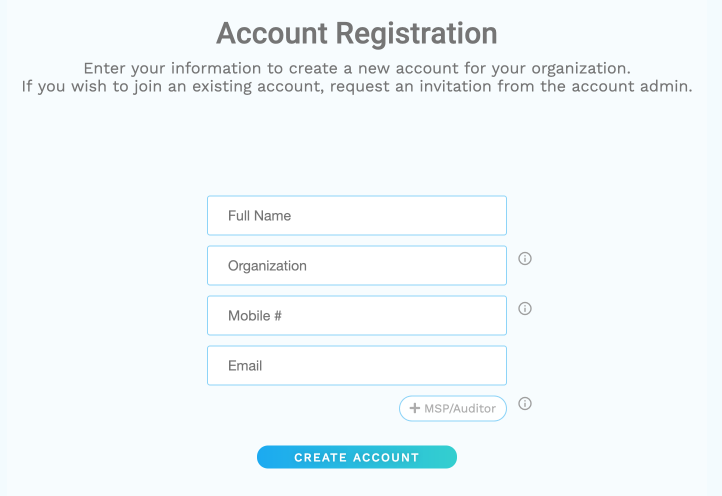
The first step is to create an organization account and an account owner.
Note that the individual’s information entered here is the Organization Account Owner.
Organization: A new account will be created for this organization.
Please Note: No exact matching organization names will be accepted in the Assessment Platform. If the organization name that you are trying to create an account for is already taken, request to join that organization or make a new organization with a different name.
Mobile Number: Multi-Factor SMS recipient mobile number.
+MSP/Auditor: MSP accounts can create assessments on behalf of clients.
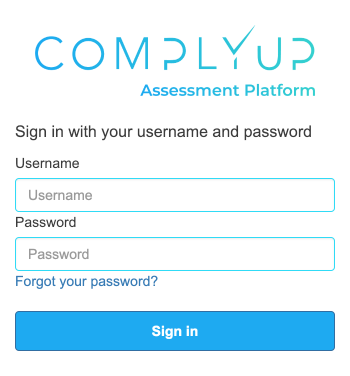
Once your registration has been submitted, you’ll receive an email with temporary credentials.
In the email containing your temporary password, there is also a link to sign in. Follow this link and enter your username and temporary credentials.
Upon successful sign in, you’ll be prompted to create a new password. Once you’ve input your new password, you’ll be redirected to the Organization Account Dashboard.
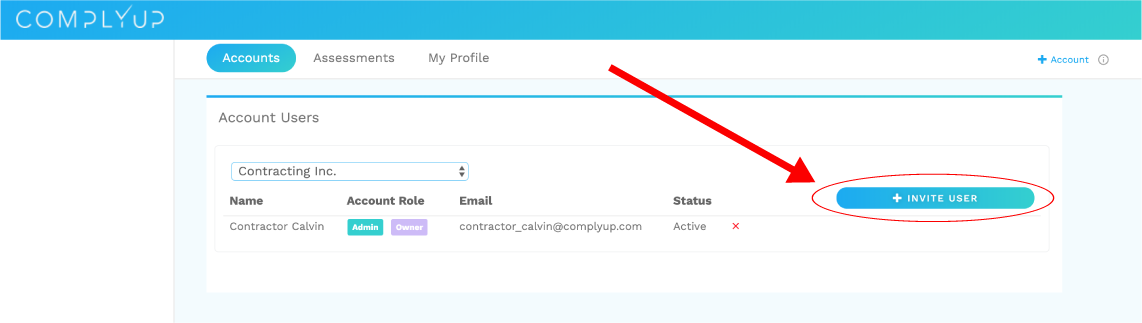
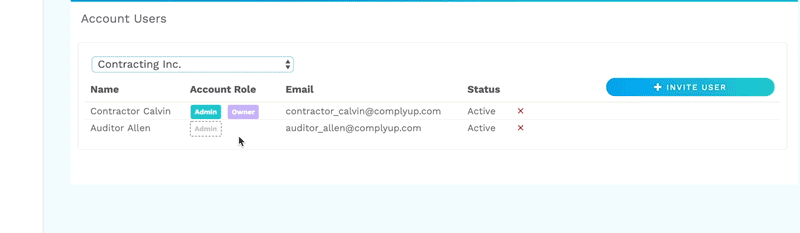
To invite users to your Organization Account, select the Administration View from the Organization Dashboard or select Account Users under the administration tab in the Assessment Dashboard (#3).
Once an invited user has accepted the invitation to join the organization, roles can be assigned to the new user on an account level or individually for each assessment.
To begin the process, click on “+ Invite User“.
Next, you’ll be asked to enter the invitee’s email address. Once you press “Send”, you’ll be asked to confirm the email address before the invitation is sent out.
Once a user has accepted your invite, you will receive an email stating that they have accepted the invitation to join the Organization Name account and that you can now assign them to assessments in the Administration View.
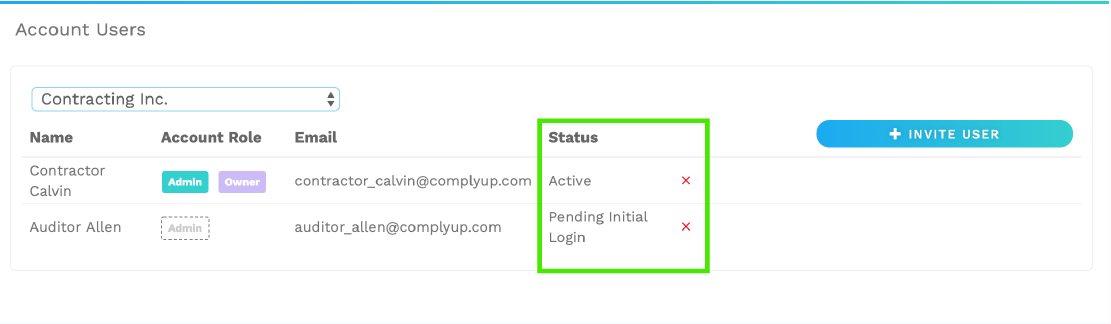
Account User Status
Once a user has accepted an invite, their account will appear under the “Account Users” section. From here, their status will be displayed as 1 of 3 states.
1. Invitation Sent
2. Pending Initial Login
3. Active
You also have the option to remove any user from the current organization account by selecting the red X.
Granting Account Admin Privileges
Once the user has accepted the invitation and logged in, you have the ability, from an account level, to make that user an admin. This would give admin rights overall current and future assessments under this particular account.
To grant admin privileges, simply select the button containing the word “Admin”.
The process to join an account begins with an invitation from an admin. You will receive an email explaining that an account admin at Organization Name has invited you to join them on the ComplyUp Assessment Platform and that by accepting you will give them the ability to add, assign, and delete you from owned assessments within the organization.
Upon accepting, you will need to input your full name, mobile phone number, and email address. This email address must match the one that the invitation was sent to.
Once completed, you will get a notification saying that you are now a part of the organization account and that temporary login credentials have been sent to your email address provided (you can change these upon the first login).
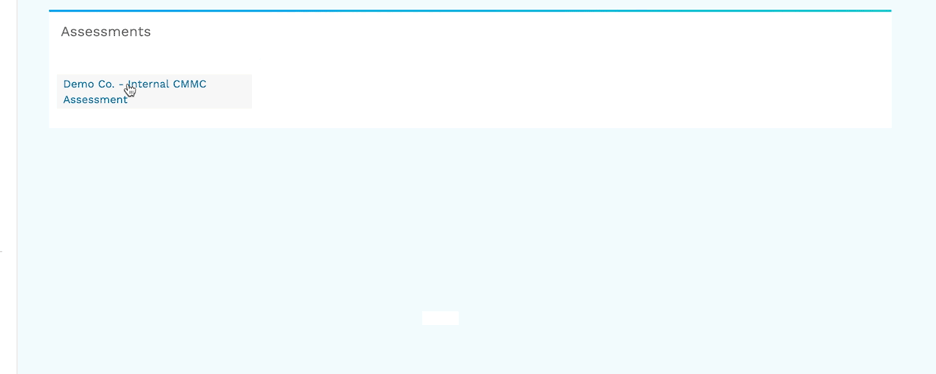
To assign users different roles per assessment, select the Assessment Users link under the administration tab in the Assessment Dashboard (#3).
You will be taken to a window with your available assessments.
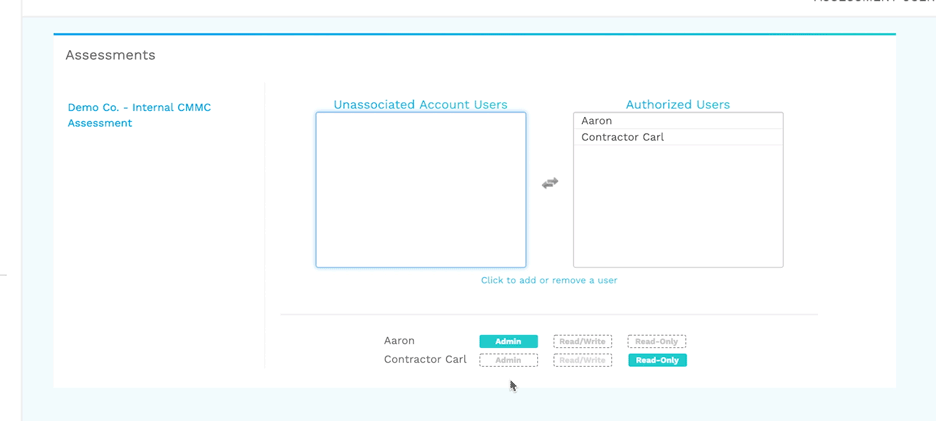
Once you select an assessment, you will see all account users grouped into one of two categories:
Unassociated Account Users & Authorized Users.
To include an account user in an assessment, simply click their name and they will be moved from “Unassociated Account Users” to “Authorized Users”.
Once the user has been authorized, you have one of three roles that you can assign them:
– Admin
– Read/Write
– Read Only
Once a user has been grouped into the Authorized Users category, their name will appear below. By selecting one of the three roles listed beside the individual’s name, you will assign that role to that individual.
This option will not be account wide; it will only be effective in the assessment that you have selected and are modifying.
As an example, if “Aaron” is the account admin but wants to give admin controls to Contractor Carl, he is able to do so while maintaining his account admin role. Any roles assigned under “Assessment Users” directly impacts the selected assessment only.
In the Administration View, select “My Profile“. From here, you will be able to enable multifactor authentication or reset your current password.
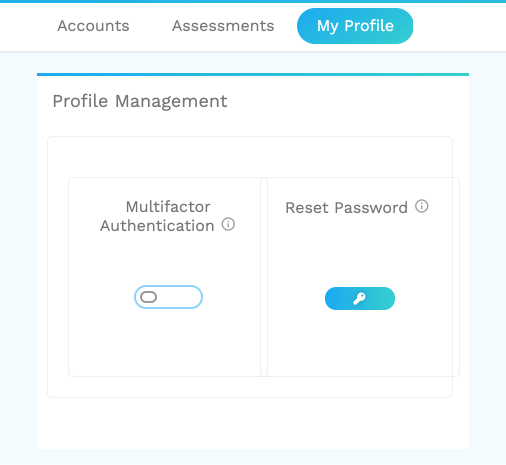
Multifactor Authentication: Enabling this option will require you to enter SMS codes sent to the mobile number you provided at account creation for each login.
Reset Password: Follow the link and enter your email address to have a password reset message sent to you.
Creating an Assessment is the first step towards centralizing data, producing deliverables, customizing your interface, etc.
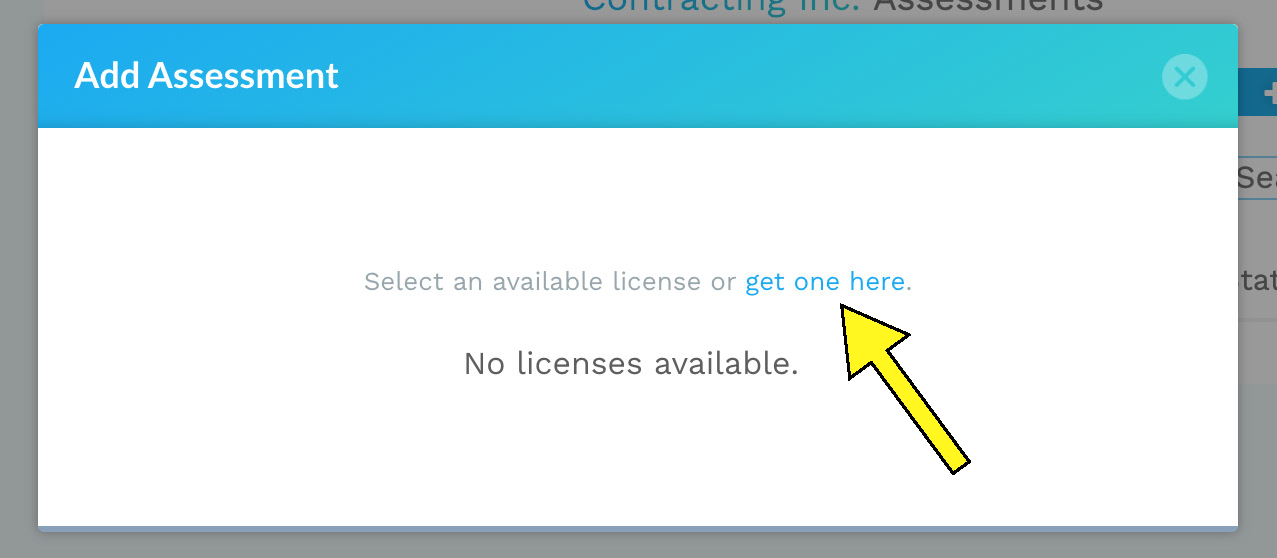
To start, select the “Add Assessment” button from the Organization Dashboard.
A window of licenses you own will open. If no licenses are owned, you can choose to trial or purchase one by selecting the “get one here” link.
To purchase a new assessment license, select “get one here” from the Add Assessment screen. A menu with all currently available assessments will appear; the name and type of assessment (shown in green), the details of the assessment license (shown in red), and the search bar (shown in blue).
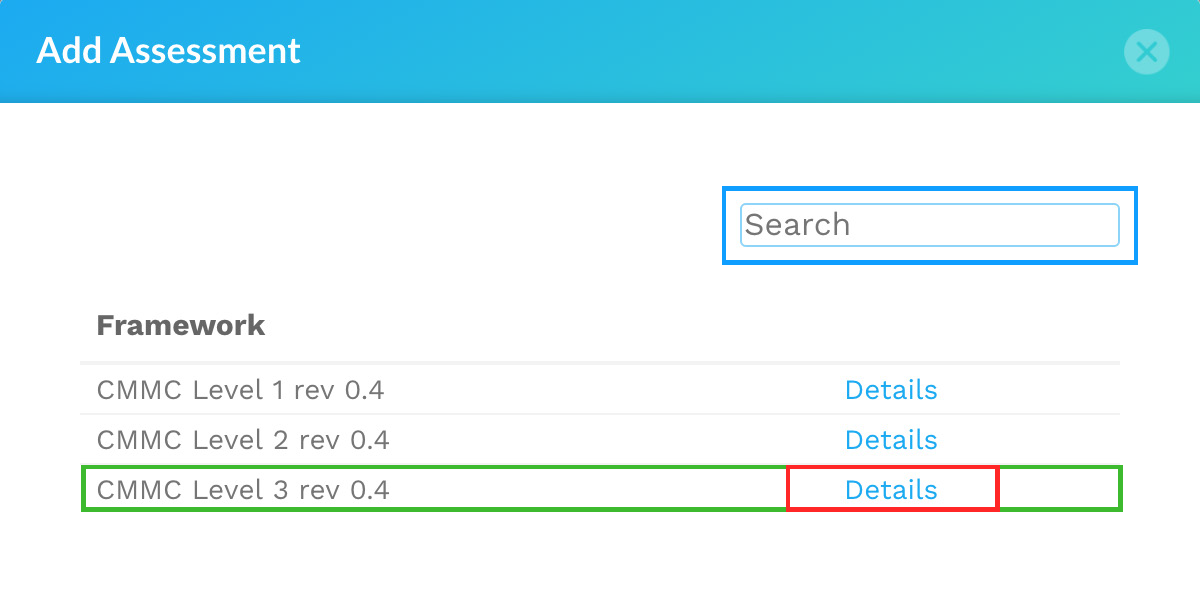
To purchase a license, locate your desired assessment in the menu and select “details“. This will open a screen with assessment information information, purchasing/trial options, and a text input area to enter coupon codes.
Once you select “details” of the assessment you wish to access, a new window will open containing the features, prices, buying options, etc. of that assessment.
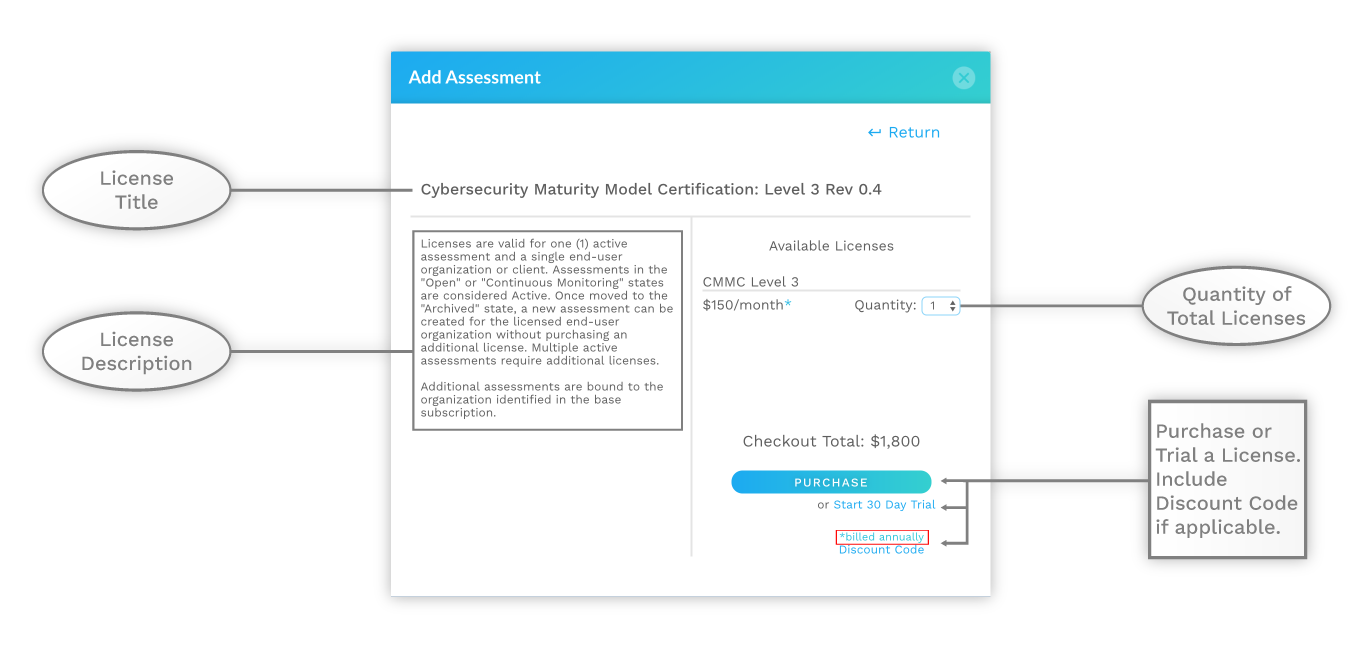
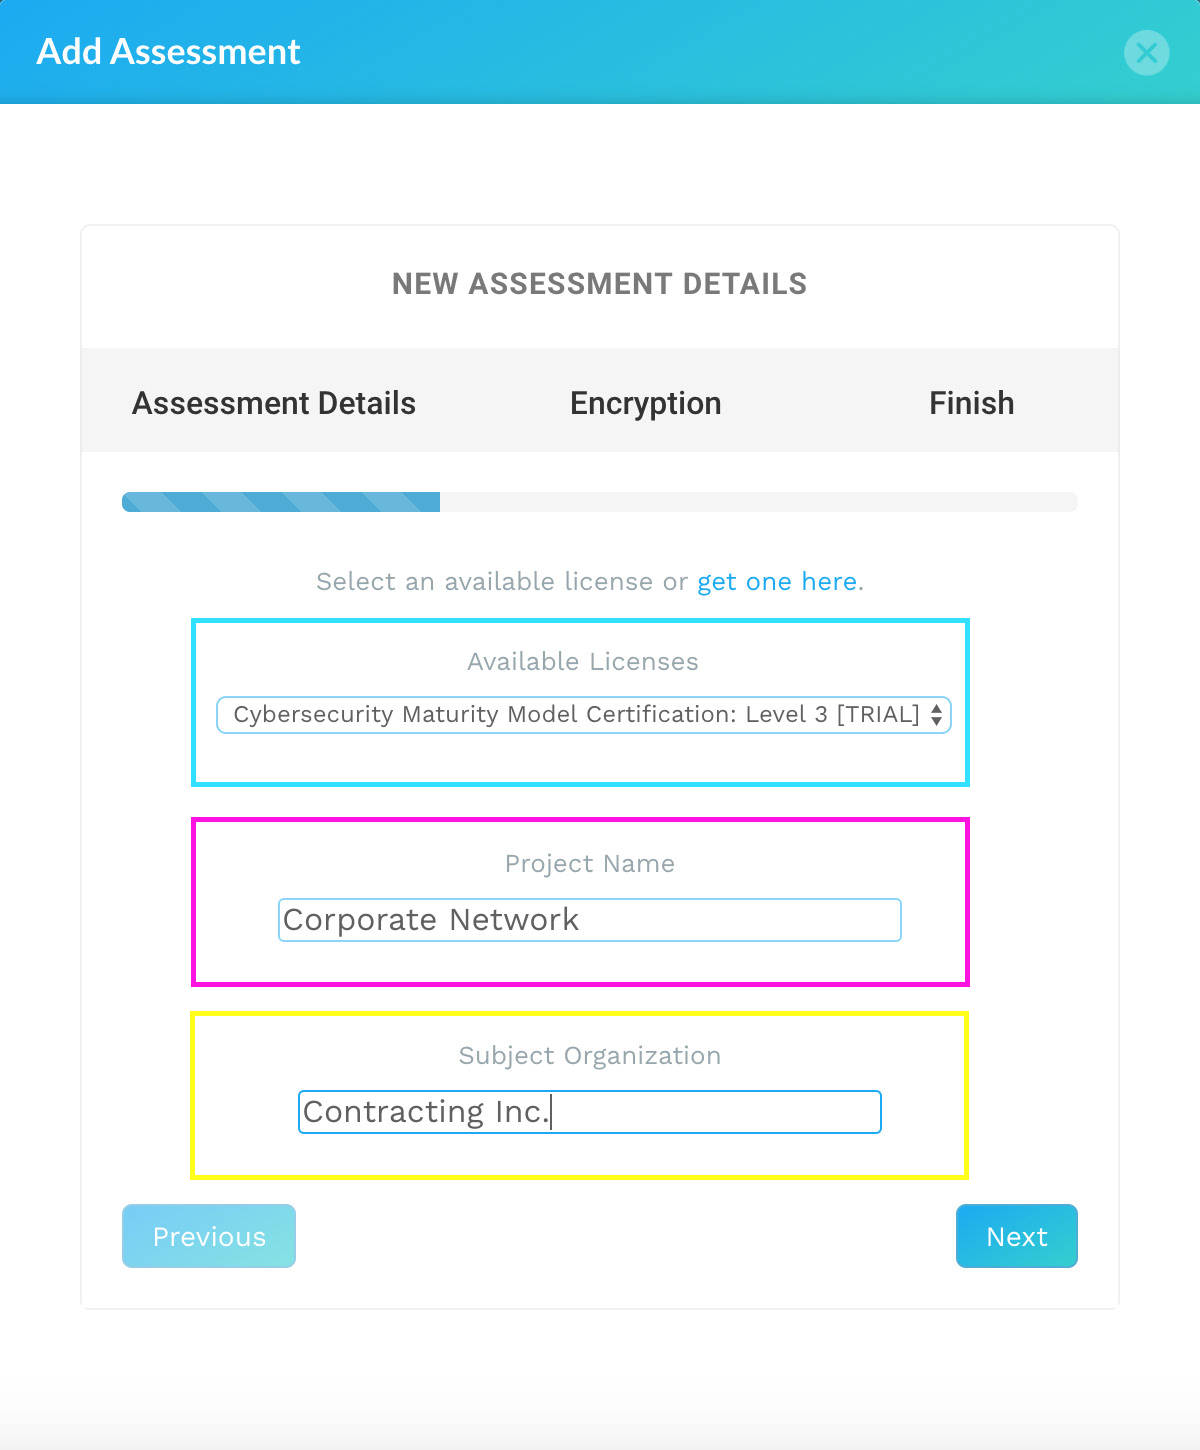
To begin an Assessment Trial, select “Start 30 Day Trial” or “Purchase” depending on whether you are trying the platform out or purchasing an assessment. Next, you will need to secure and organize your assessment account with a few details before entering the assessment. This will consist of three short steps (“add assessment details”, “add assessment encryption”, and “finalize”).
Step 1
Step 2
This step is critical to securing your account and has some important details to keep in mind as you continue. If creating an encryption key for the first time, it is imperitive to heed that ComplyUp does not have access to this passphrase or your encryption key and will be unable to decrypt your data should you lose this passphrase.
Encryption Key:
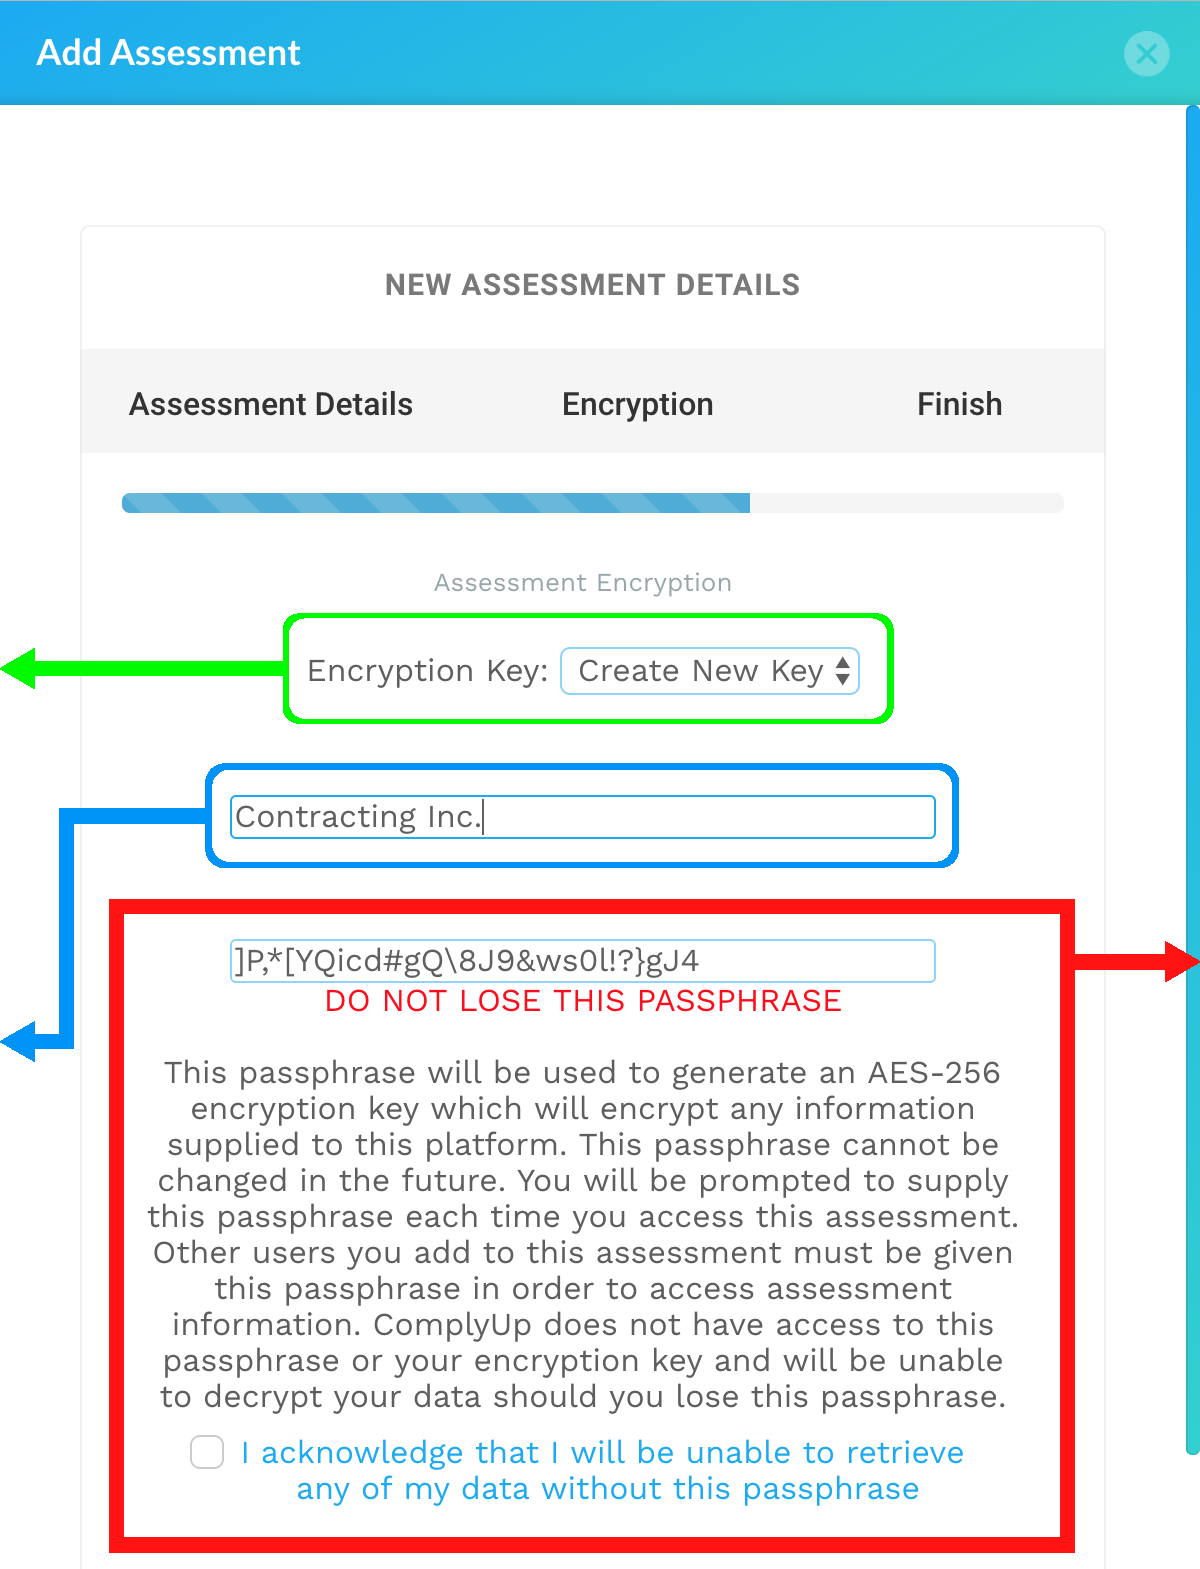

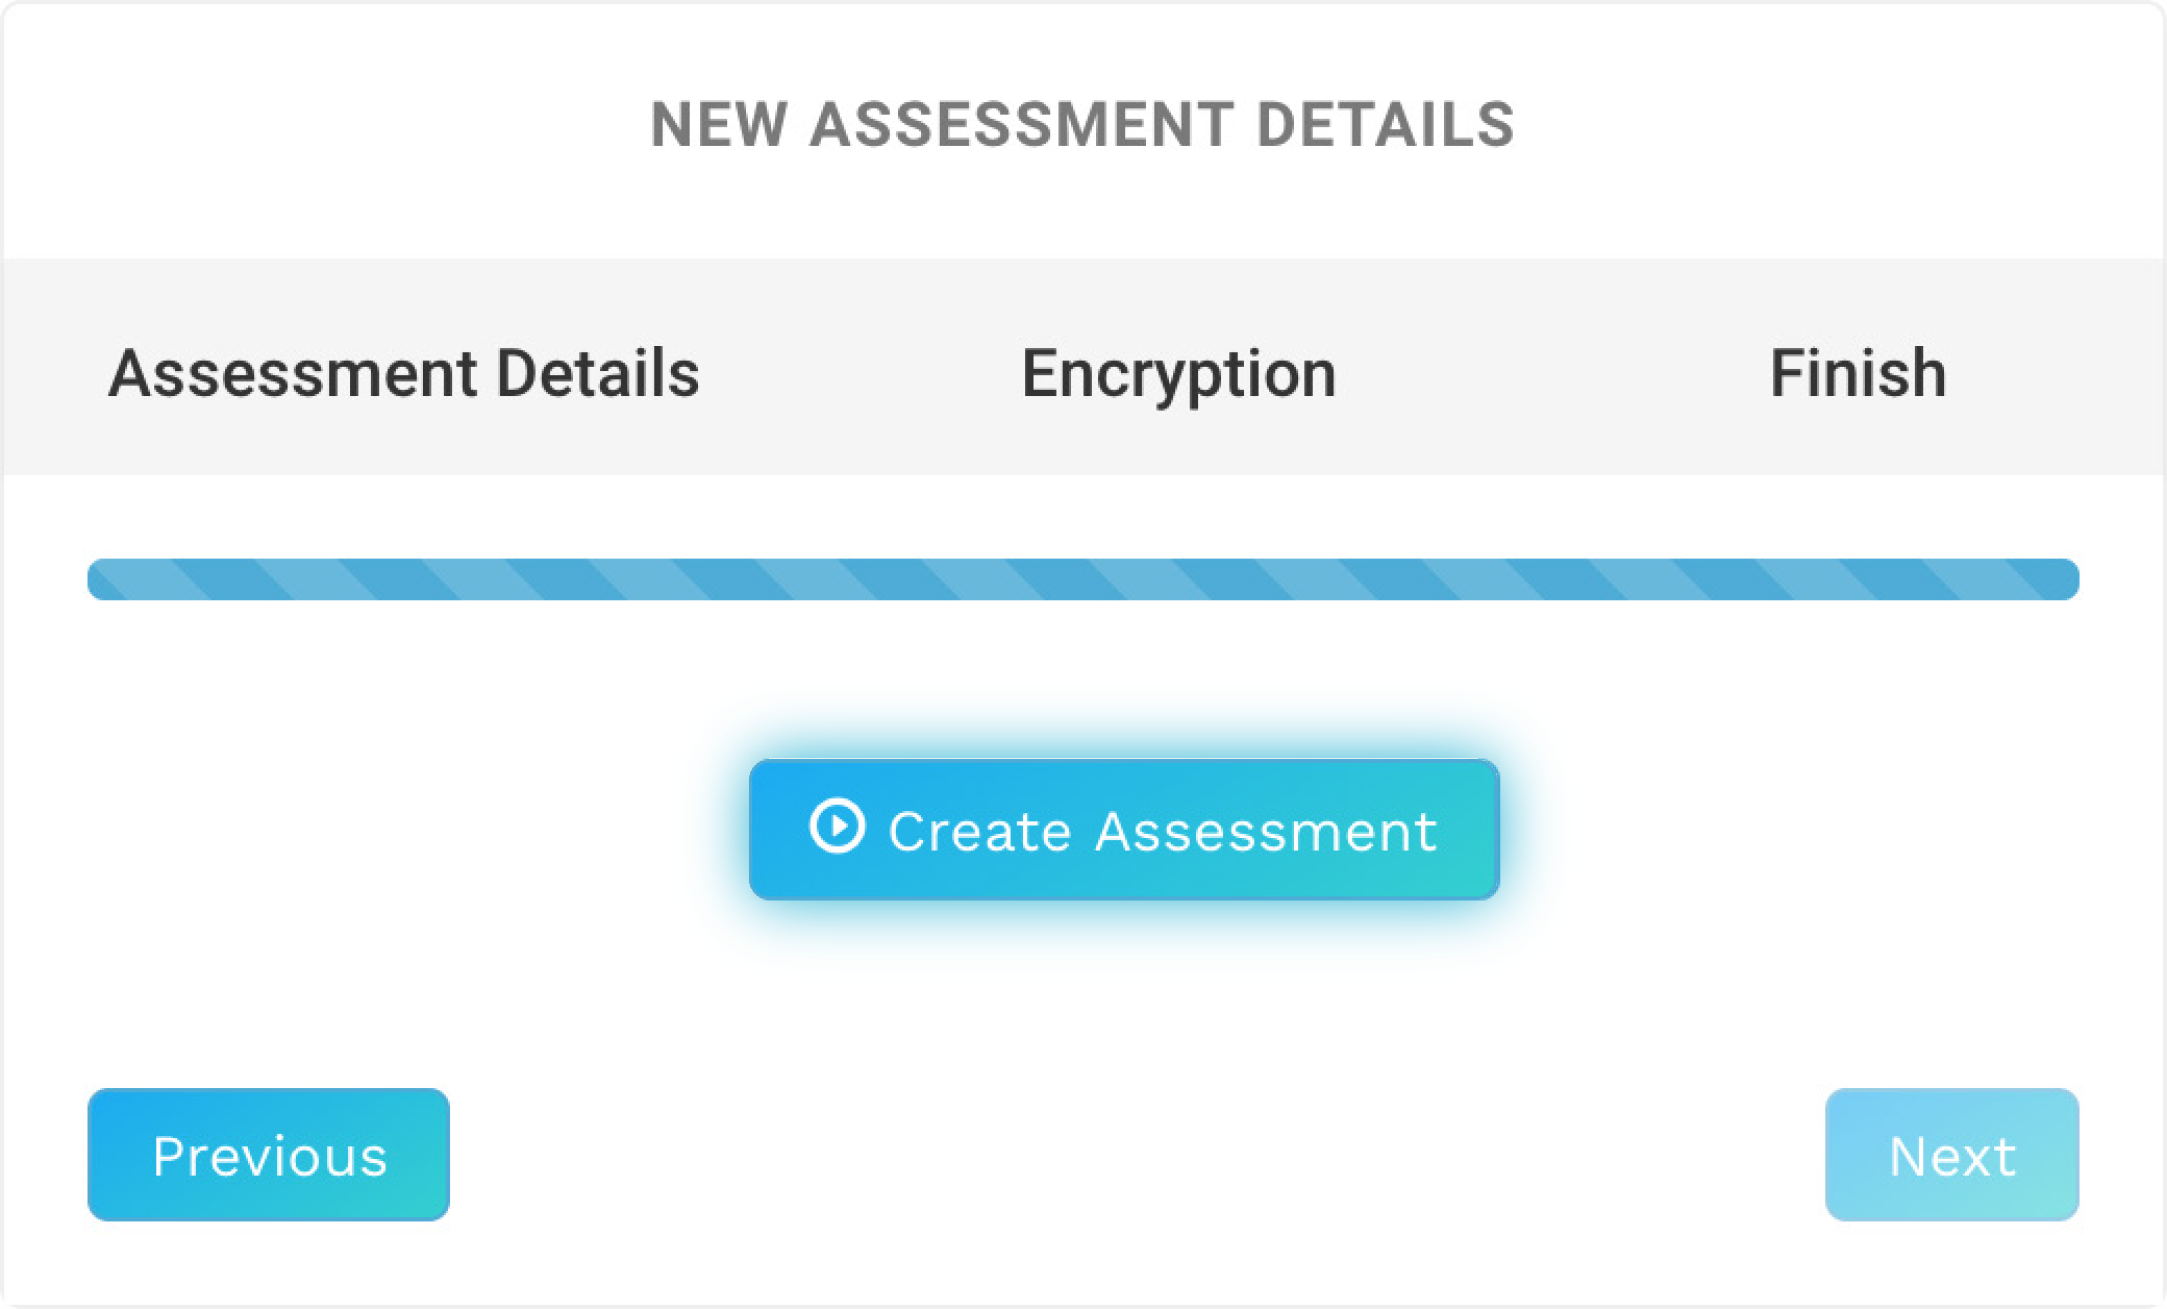
Step 3
The final step is to simply confirm your previous inputs and create your assessment.
Note:
This is the last chance to change/confirm your Encryption Key Passphrase.
You will be taken back to the Organization Dashboard where you can find your new assessment being prepared under current assessments. The status of the assessment will say “Building” while it is being prepared and you will see a loading sequence beside it.
This process can take up to 5 minutes.
When the assessment’s UI has been fully built, you will see the status change to “Open” and “In Trail”.
At this point, you have successfully started a trial.

While in a trial, there will be an UPGRADE button above the License Type (#6) in the Assessment Dashboard. Upon clicking this button, a new window will open similar to “Add Assessment” window shown when Acquiring a License. The only difference we see is that the “Start 30 Day Trial” link has been removed.
After going through the steps and verifying the purchase, your assessment will automatically become a paid subscription.
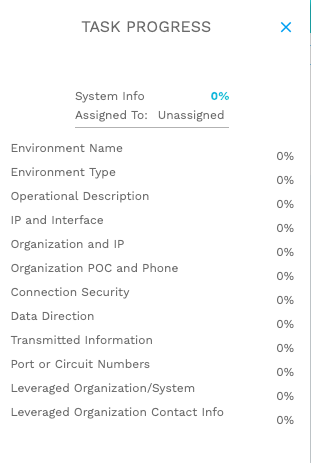
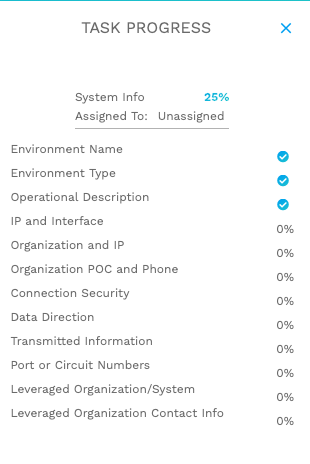
There are many ways to track your progress as you move through various sections of the Assessment Platform.
When any graphical representation of data is generated on your Assessment Dashboard, you have the ability to hover your mouse over any field and see the current progression in that field. This feature is present in every graph.
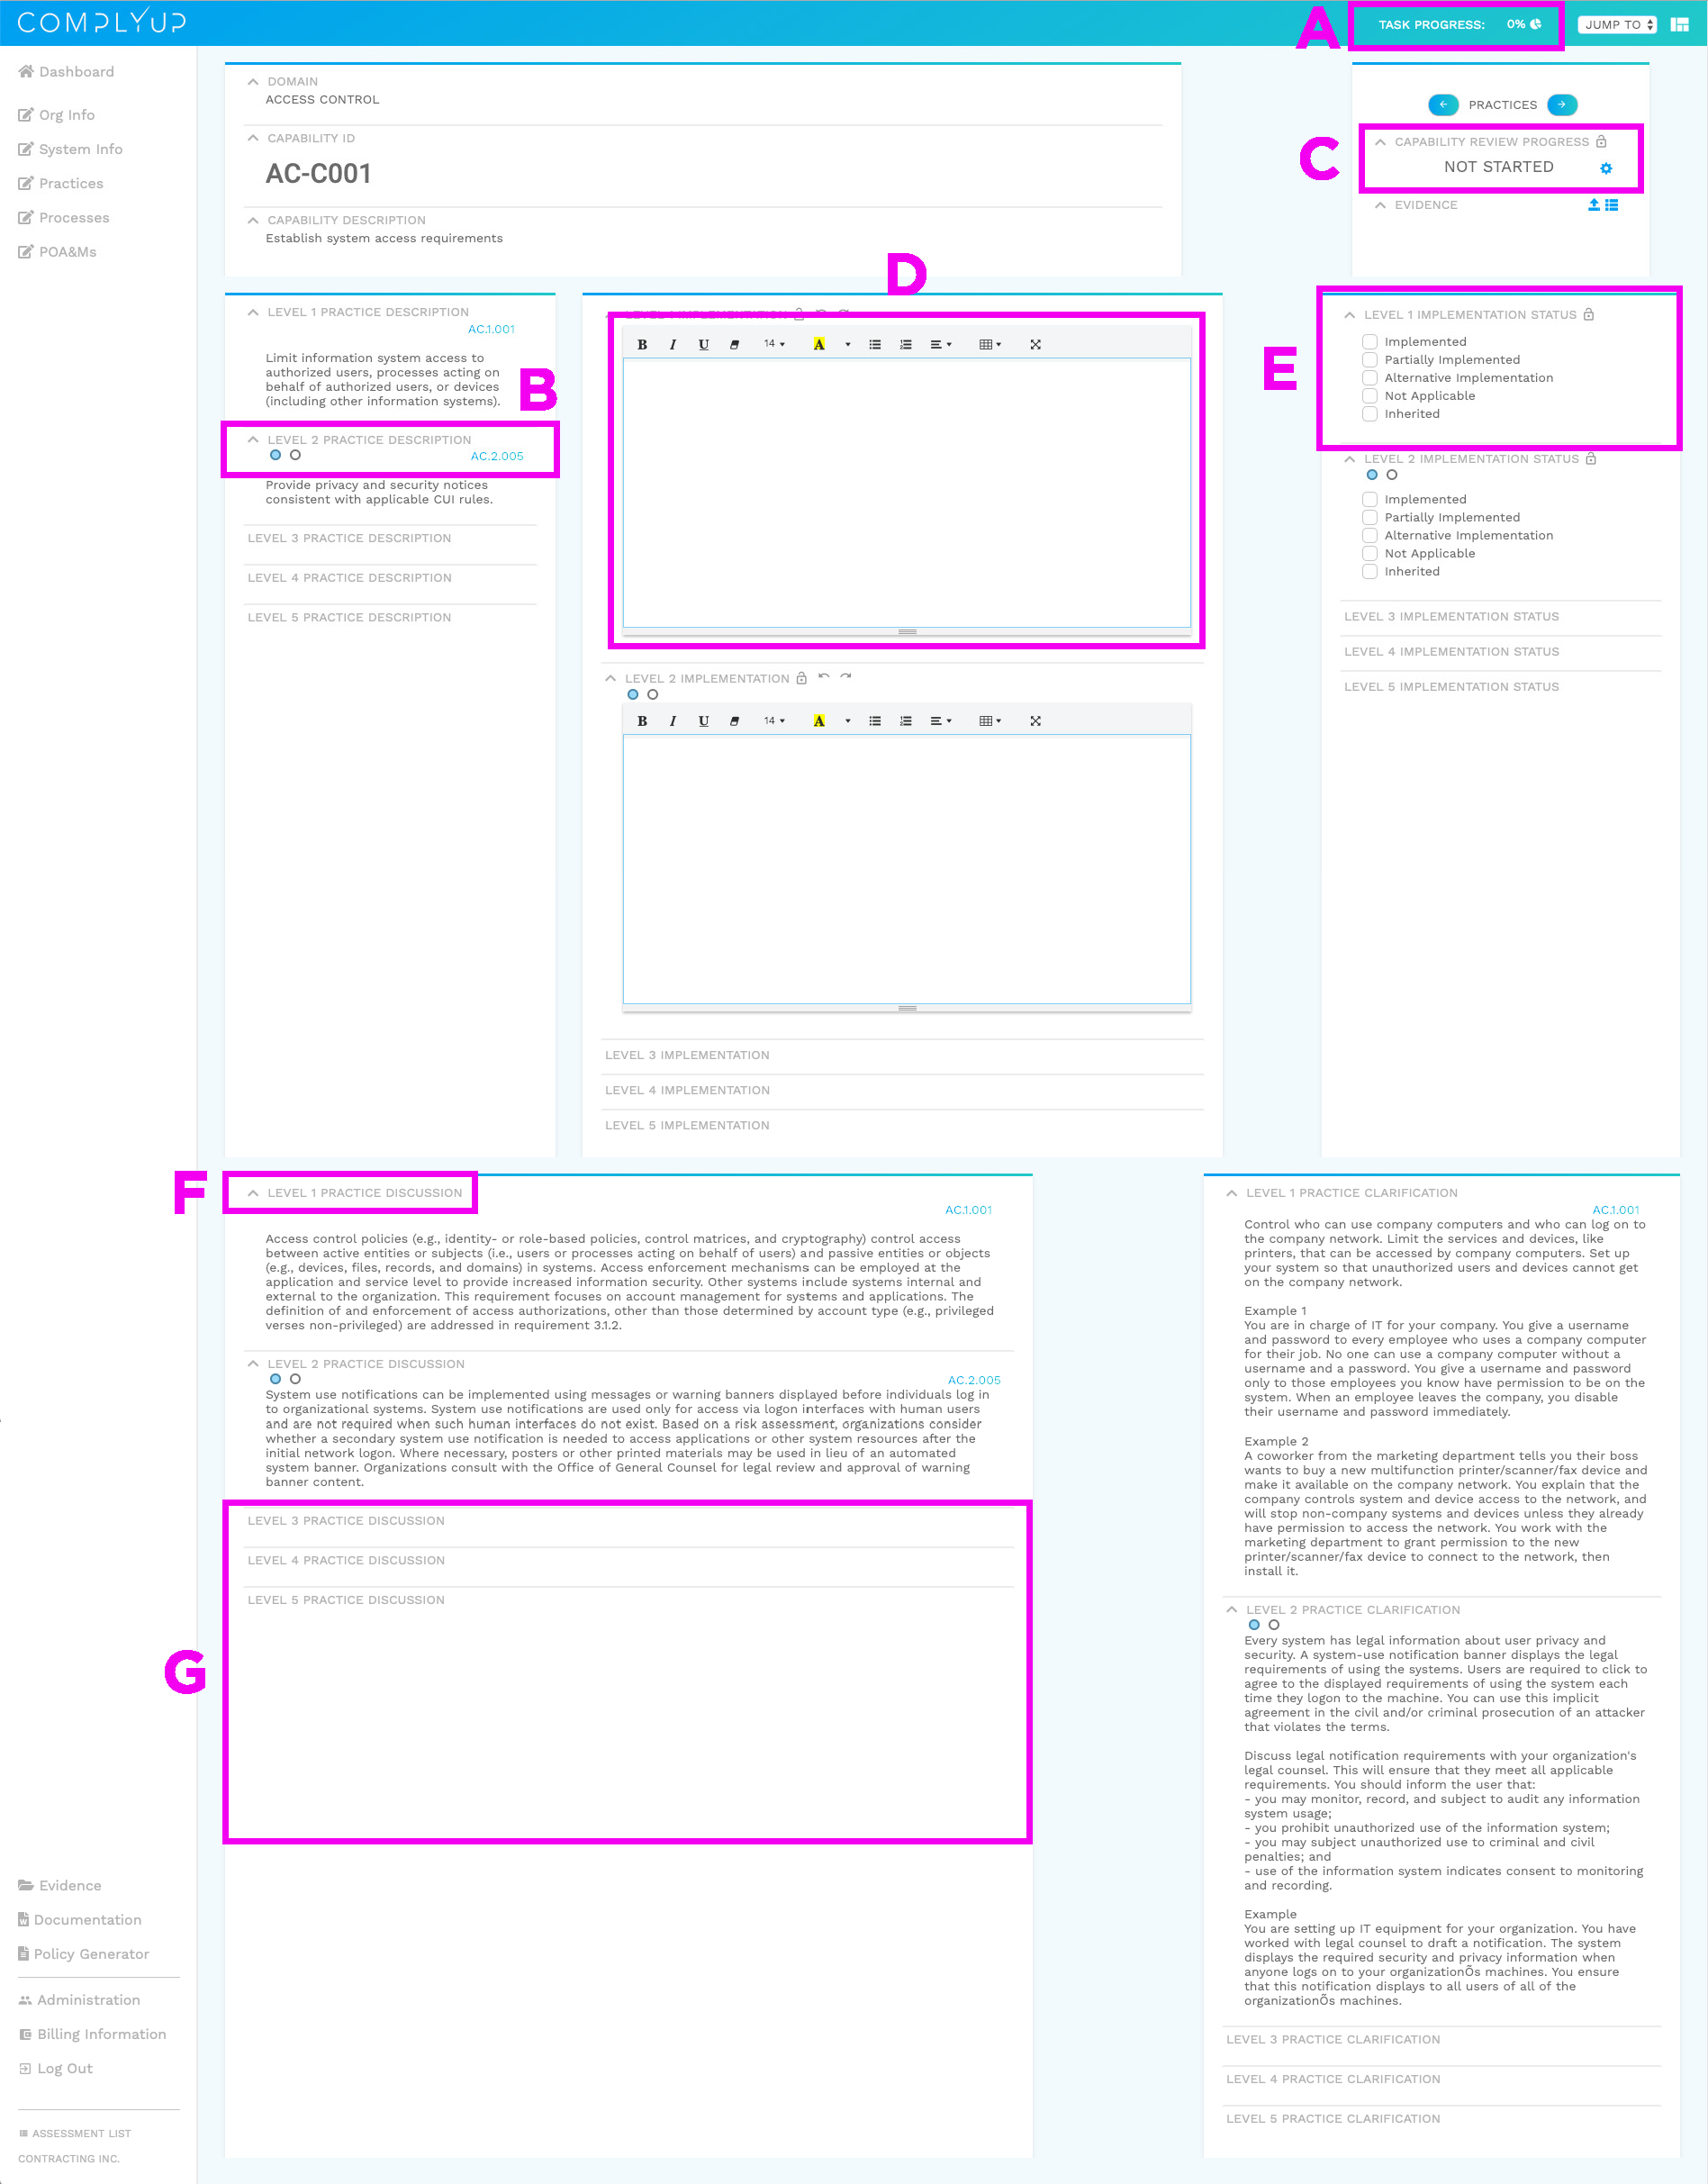
Another way to track progression is to use the “Task Progression” tool in the upper right section of any requirement (seen as A in the Requirement Dashboard).
As you progress through an assessment and finalize requirement, the tools will fill to show you how far along you are. Below, you can see the comparison of a requirement that has not yet start (the left) vs. one that has information filled out (the right).


Uploading Artifacts
Uploading any necessary files can be done in a variety of different circumstances on the assessment platform. When there is an available upload input, you select inside of the box and it will prompt you to drop a file in a new window. You also have the option of clicking inside the new window and uploading it from your file directory.
Uniform Navigation
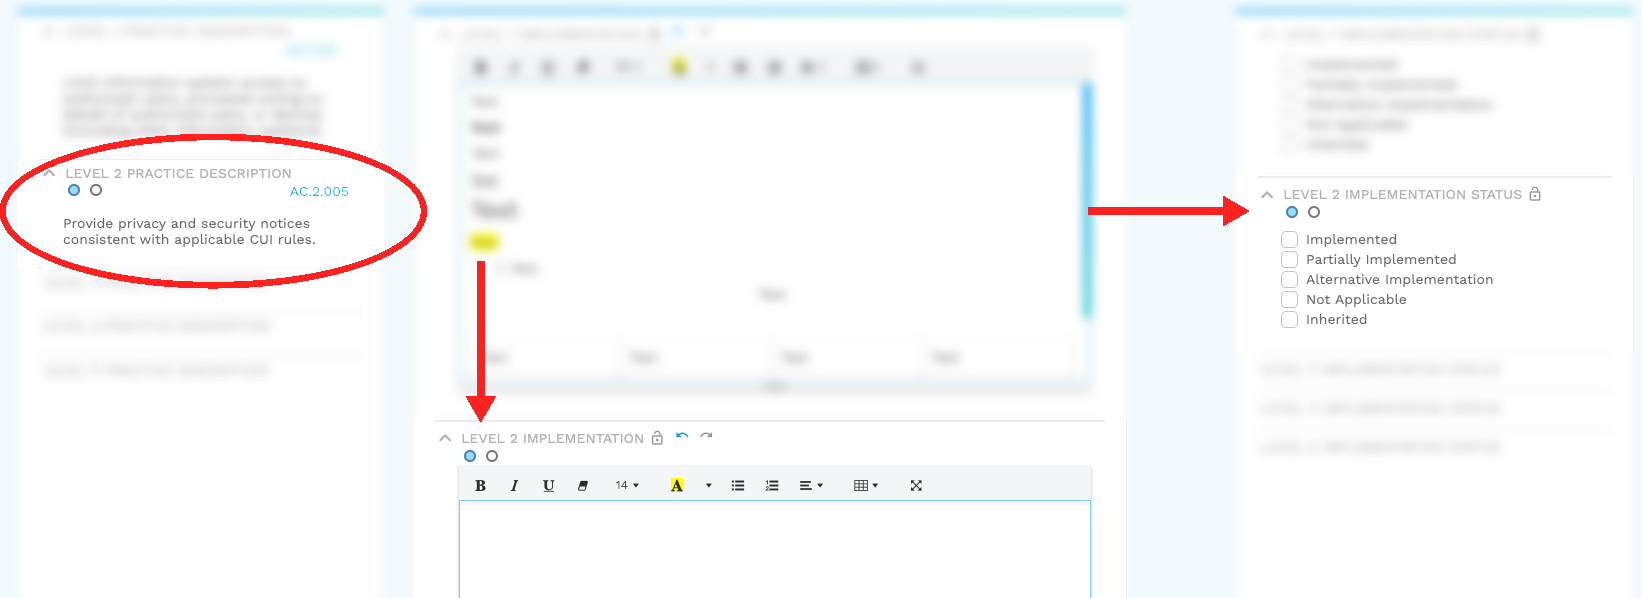
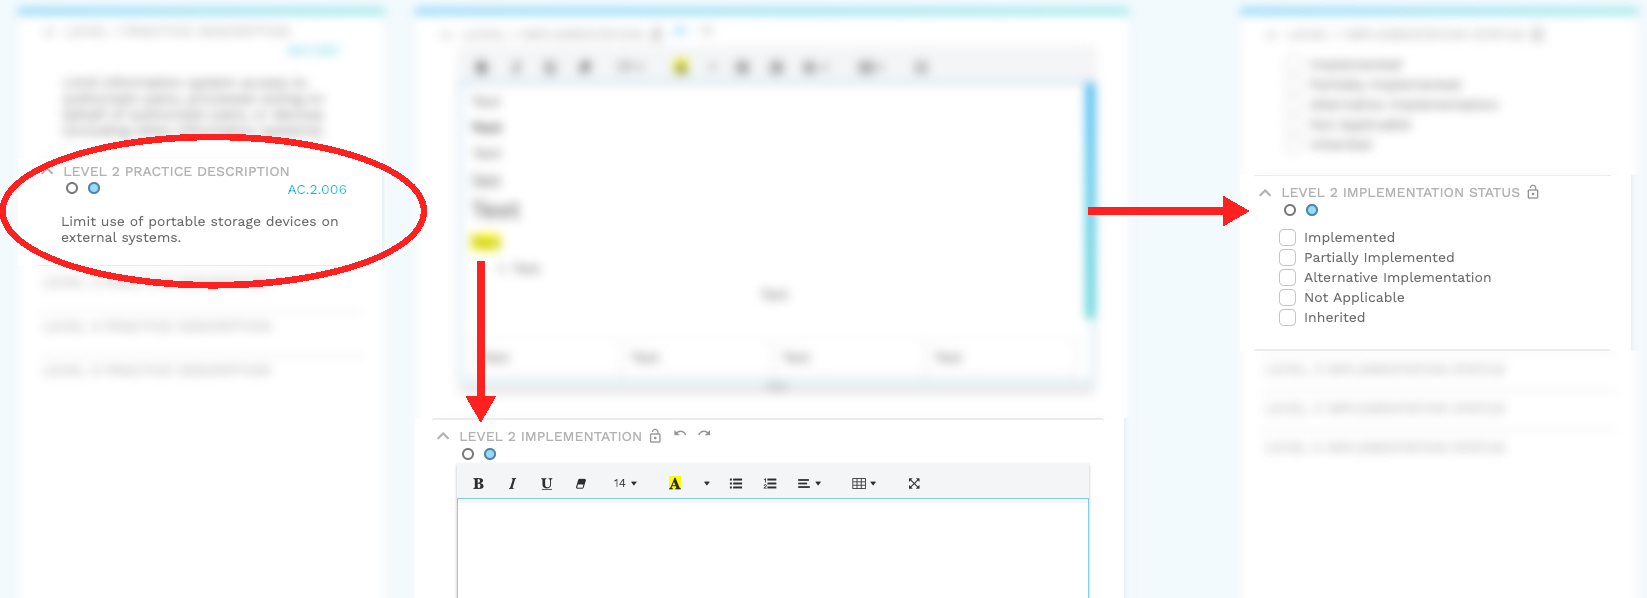
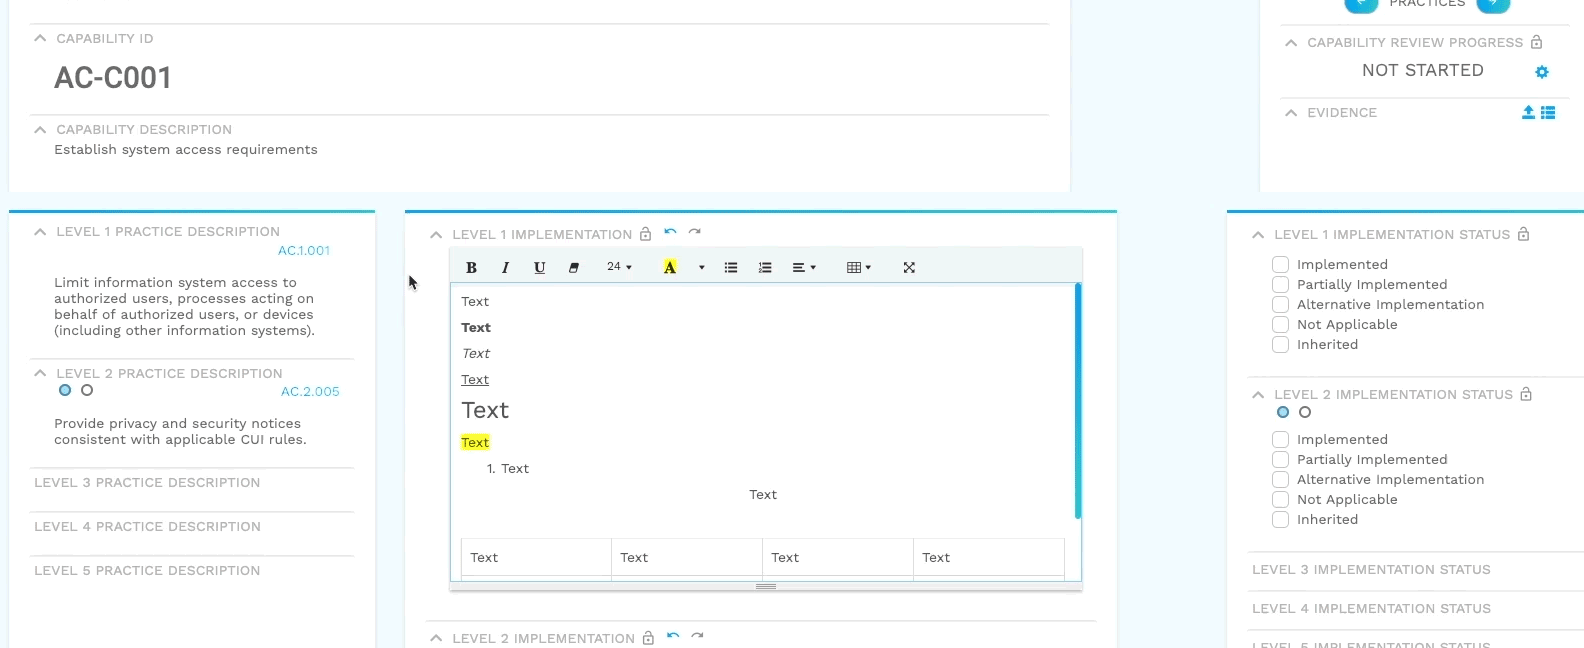
Within assessments, you will find that certain platform features align with other platform features. For example, a control may have multiple subsections that need to be completed within that same control ( Seen in B of the Requirement Dashboard ).
For instances such as this, the assessment platform links all aspects of a subsection together. If you select the next section on a text input (done by clicking into the small circle), you will automatically navigate to the next section of the control description, checkboxes, etc.
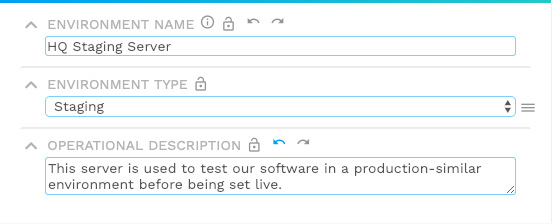
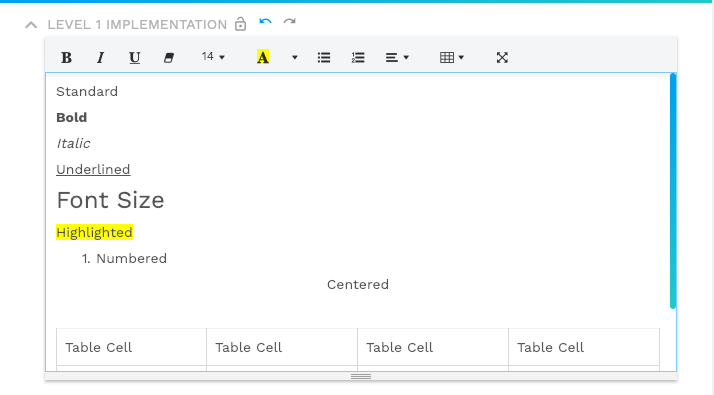
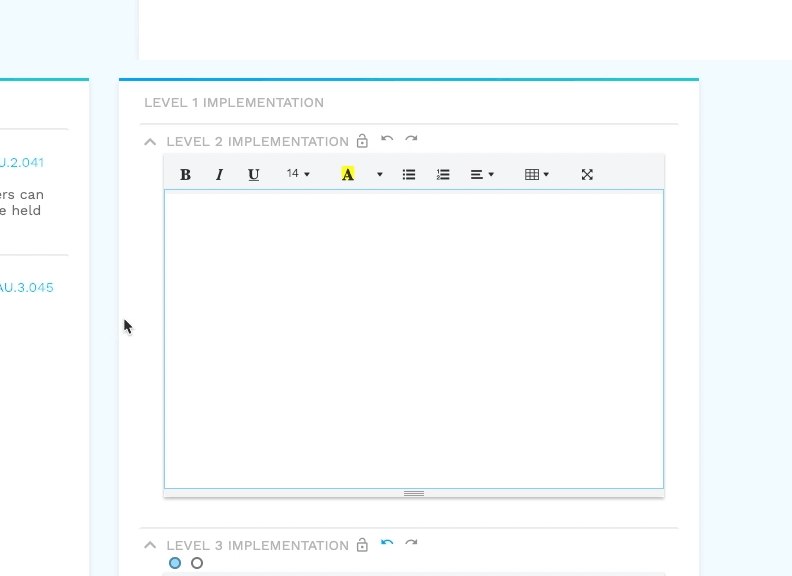
Text Fields
There are two types of text input fields throughout an assessment. There are input fields where the text is being taken only as keystrokes; non-formatted text.
The other is a more advanced text field. This field can be formatted and can be used in a variety of ways. It may be for your team use within the platform, or there are some sections of some regulations, standards, etc. where you can input advanced text options.
Checkboxes
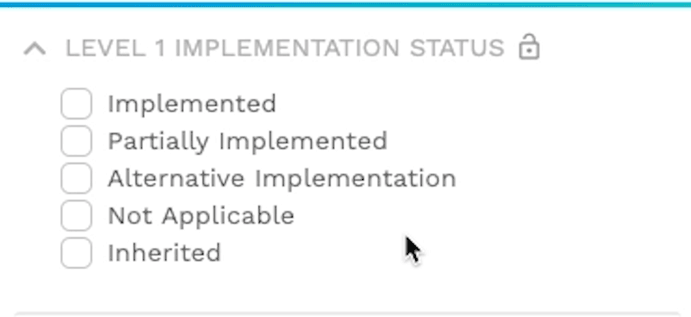
Throughout an assessment, there will be many occasions where it is necessary to use checkboxes. One of the biggest is requirement implementation status. The boxes are manually marked when you fully implement a requirement, partially implement a requirement, use alternative implementation, surmise that the requirement is not applicable or it is inherited. An example of this can be seen in the Requirement Dashboard in the section labeled E.
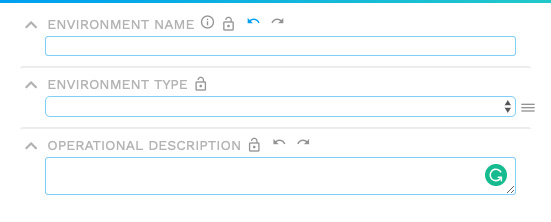
Lock Function
The lock function is used in many sections throughout assessments ( See C and E in the Requirement Dashboard ) to avoid accidental modifications and tidy up finished pieces as you move along. Once a piece of the assessment has been locked, it cannot be changed in any way other than unlocking it first.
To lock a portion of the assessment, simply click the lock icon () .
To unlock, click the lock icon again and confirm you wish to unlock this portion of the assessment.
Hide Function
The hide function is an imperative feature used to keep your assessments organized and efficient. Most fields ( refer to exampled B, C, E, and F in the Requirement Dashboard ) have an option to hide the entire field once you are finished working on it for the time being. Once selected, every subsection associated with that field will also be hidden.
To unhide a section, simply click the arrow on the appropriate section and it will expand once again.
Autosave Sequences
Any time that there is an option for text to be entered, there will be two arrows above the field. They will appear gray at first, but as you enter text, one will change to blue. This is a sign that what you have written thus far has been temporarily saved in your browser. That way, if you need to delete text on accident, there is an autosaved version of that text that you have the ability to return to. The same can be used to work in reverse order. If you want to delete everything that you just entered, you can reverse the state that it is in.
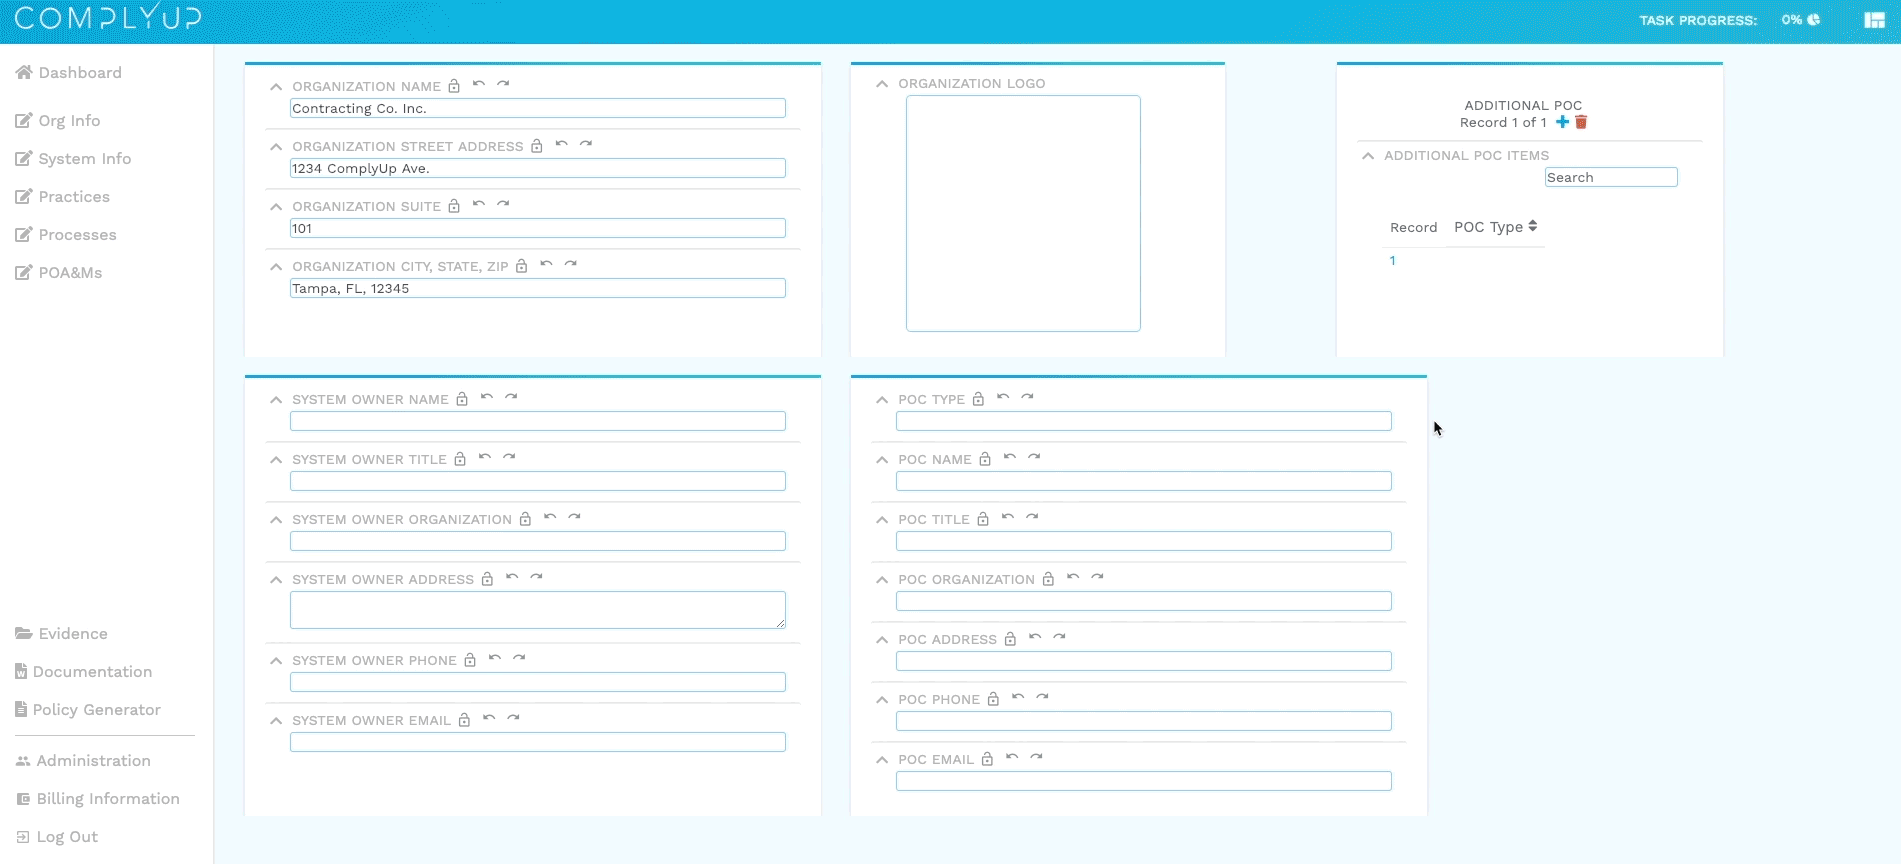
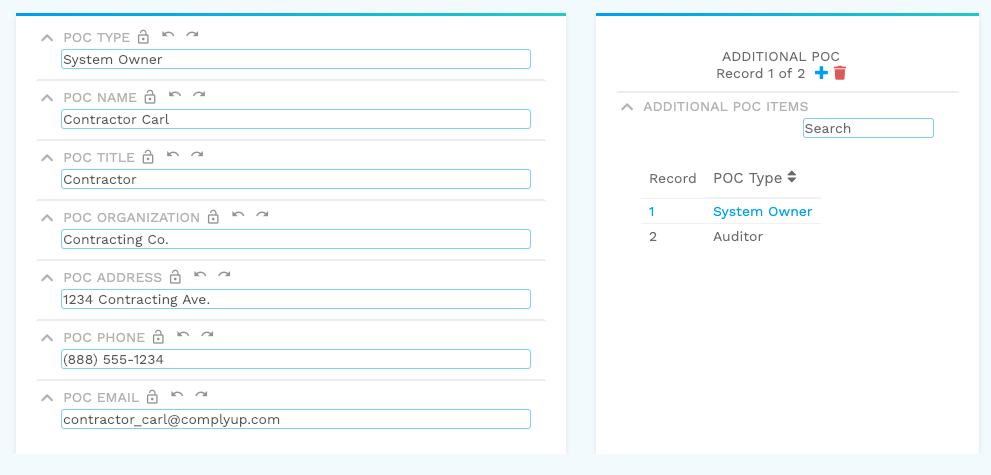
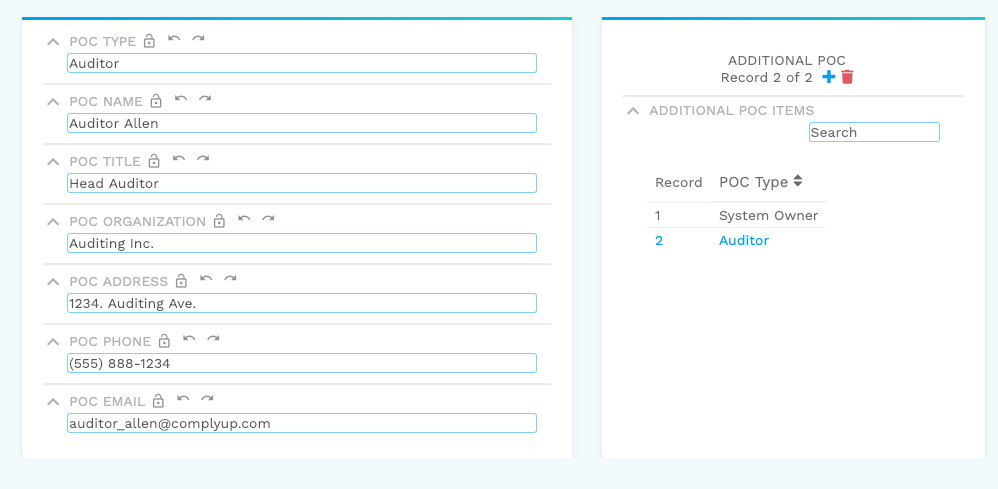
Indefinite Quantity Fields

A. Input Fields
When a new indefinite quantity field is created, it will associate particular fields with it. In this case, we’re creating an additional point of contact, therefore, fresh input fields for the new poc’s info will appear.
B. Options
Here, you can create a new indefinite quantity item (by clicking the blue plus symbol), delete an existing indefinite quantity item (by clicking the red trash can symbol), and see how many are currently in existance for the specific section that it belongs to.
C. Records
This section keeps track of all the indefinite quantity items created. You can quickly jump to the info for an indefinite quantity item by clicking its title that is located here. Most sections have a sort and search option available as well
Below is an example of two indefinite quantities from the same section of an assessment (Additional Point of Contact). The Input Field changes with each to represent the new information for each new contact. The Options area would have been used to create the second contact and shows current number / total number of contacts. Lastly, the Records shows which contact is currently displayed and able to be edited based on the Point of Contact Type.
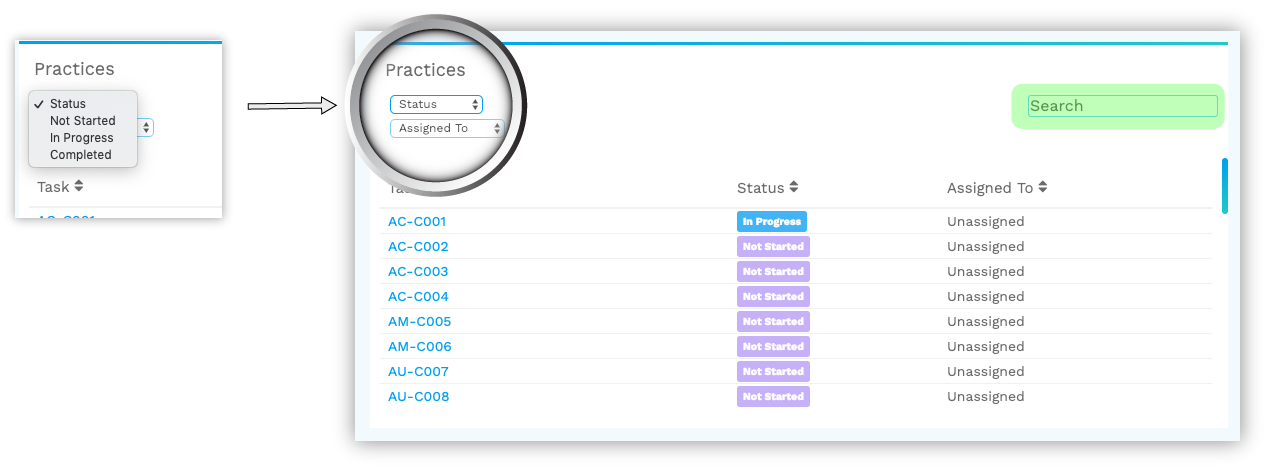
Sort By / Search
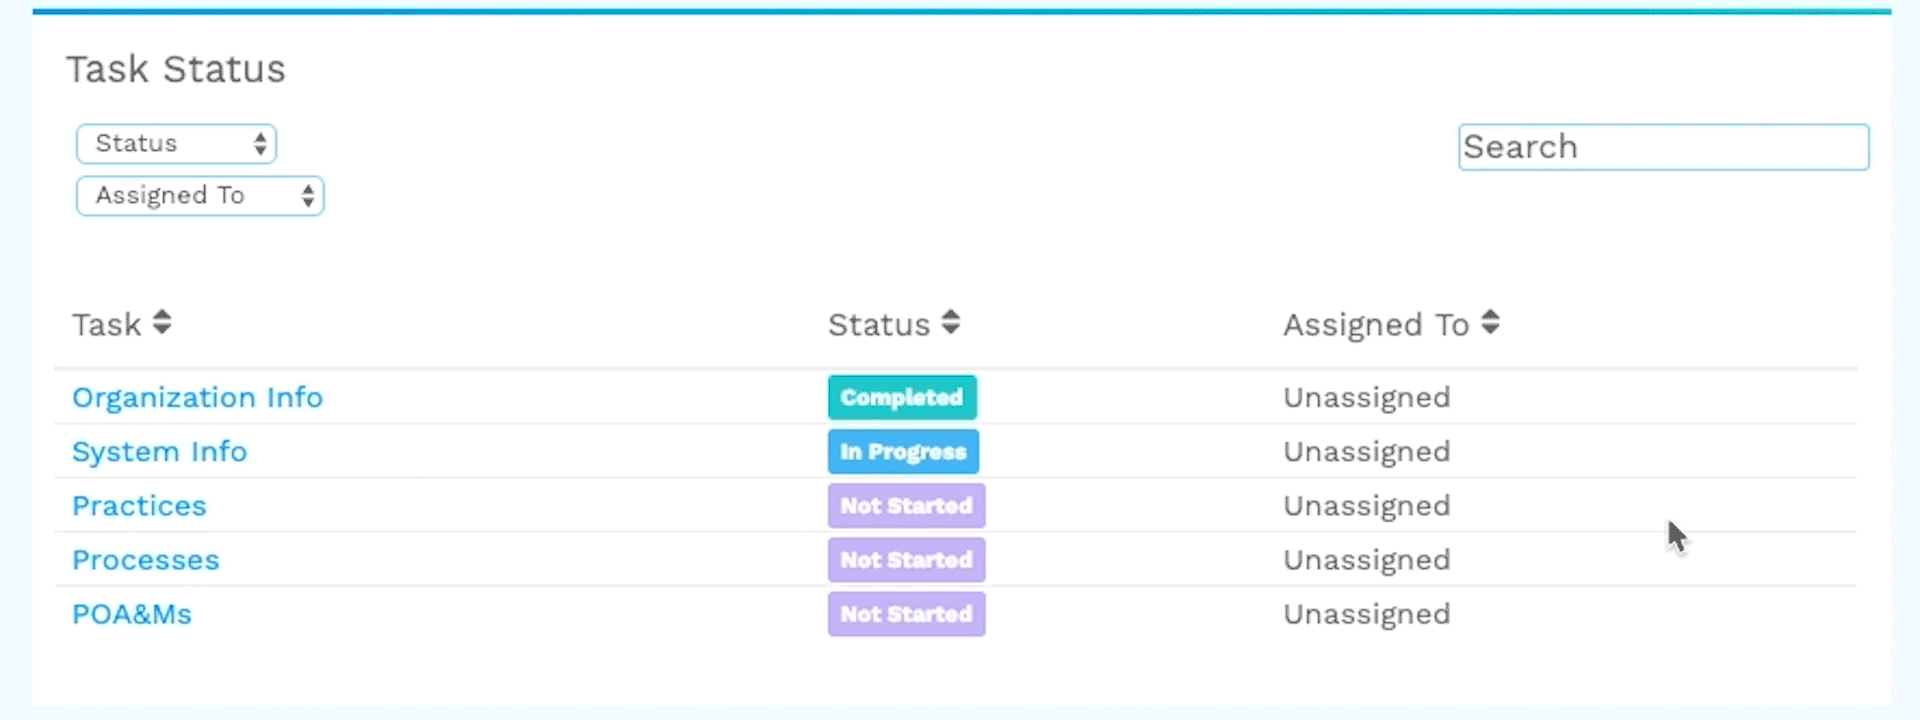
Many fields are equipped with search and sort functions to make navigation throughout your assessment easier. Highlighted in green, you are able to see a common search field. When used, they can filter through “Tasks”, “Status”, and “Assigned To” to help find and filter whatever you may need.
Similarly, on the left side of the Practices screen, we are able to see a drop-down with task statuses. When selected, this will filter all the results seen to match the drop-down selection.
Information Quick Tips
Whenever a icon (Information Quick Tip) is present within a section of the CU-AP, it can be clicked on to gather more information about the section that it’s representing. You may find these on simple Organization Info fields or, in some cases, they are used on assessment specific items that need further explaining.
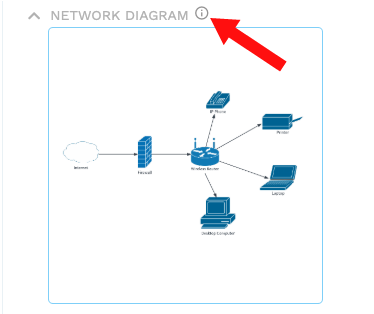
A new window will open with the information pertaining to the area where the Information Quick Tip was located. To exit, either move your mouse away from the window and you will see an animation representing a short timer, or simply select the x in the top right-hand corner of the window.

Assigning tasks is used to split an assessment up between multiple users. To do so, hover over anywhere that says “Unassigned” or has a user’s name already assigned. Upon selecting the link, there will be a dropdown will all available users. Once a user has been selected, they are assigned that task.
This will modify how their dashboards display progression, which tasks they see, et.
One of the biggest features of the platform is the ability to generate different forms of documentation, deliverables, etc. Each license comes with the set of documentation structures necessary to be produced. To access the list of available documents or deliverables for your current assessment, visit the Documentation tab located in the Assessment Features (#2) of the Assessment Dashboard. Once one of the documents has been selected, two new fields will open.
The first is Version History.
This will keep historical evidence of every new major or minor version of the selected document. It will record who produced it, which revision it is, the date it was produced, whether it was a major or minor version, and a download link.
The second is Generate.
Here you have the ability to generate new versions of the selected piece of documentation. You can choose between “Major” and “Minor” depending on the level of modifications you deem appropriate for each tier. Once generated, it will appear under Version History.

The other option is to download an untracked working copy. This means that you will begin a download for the selected piece of documentation without creating a new version with historical data.
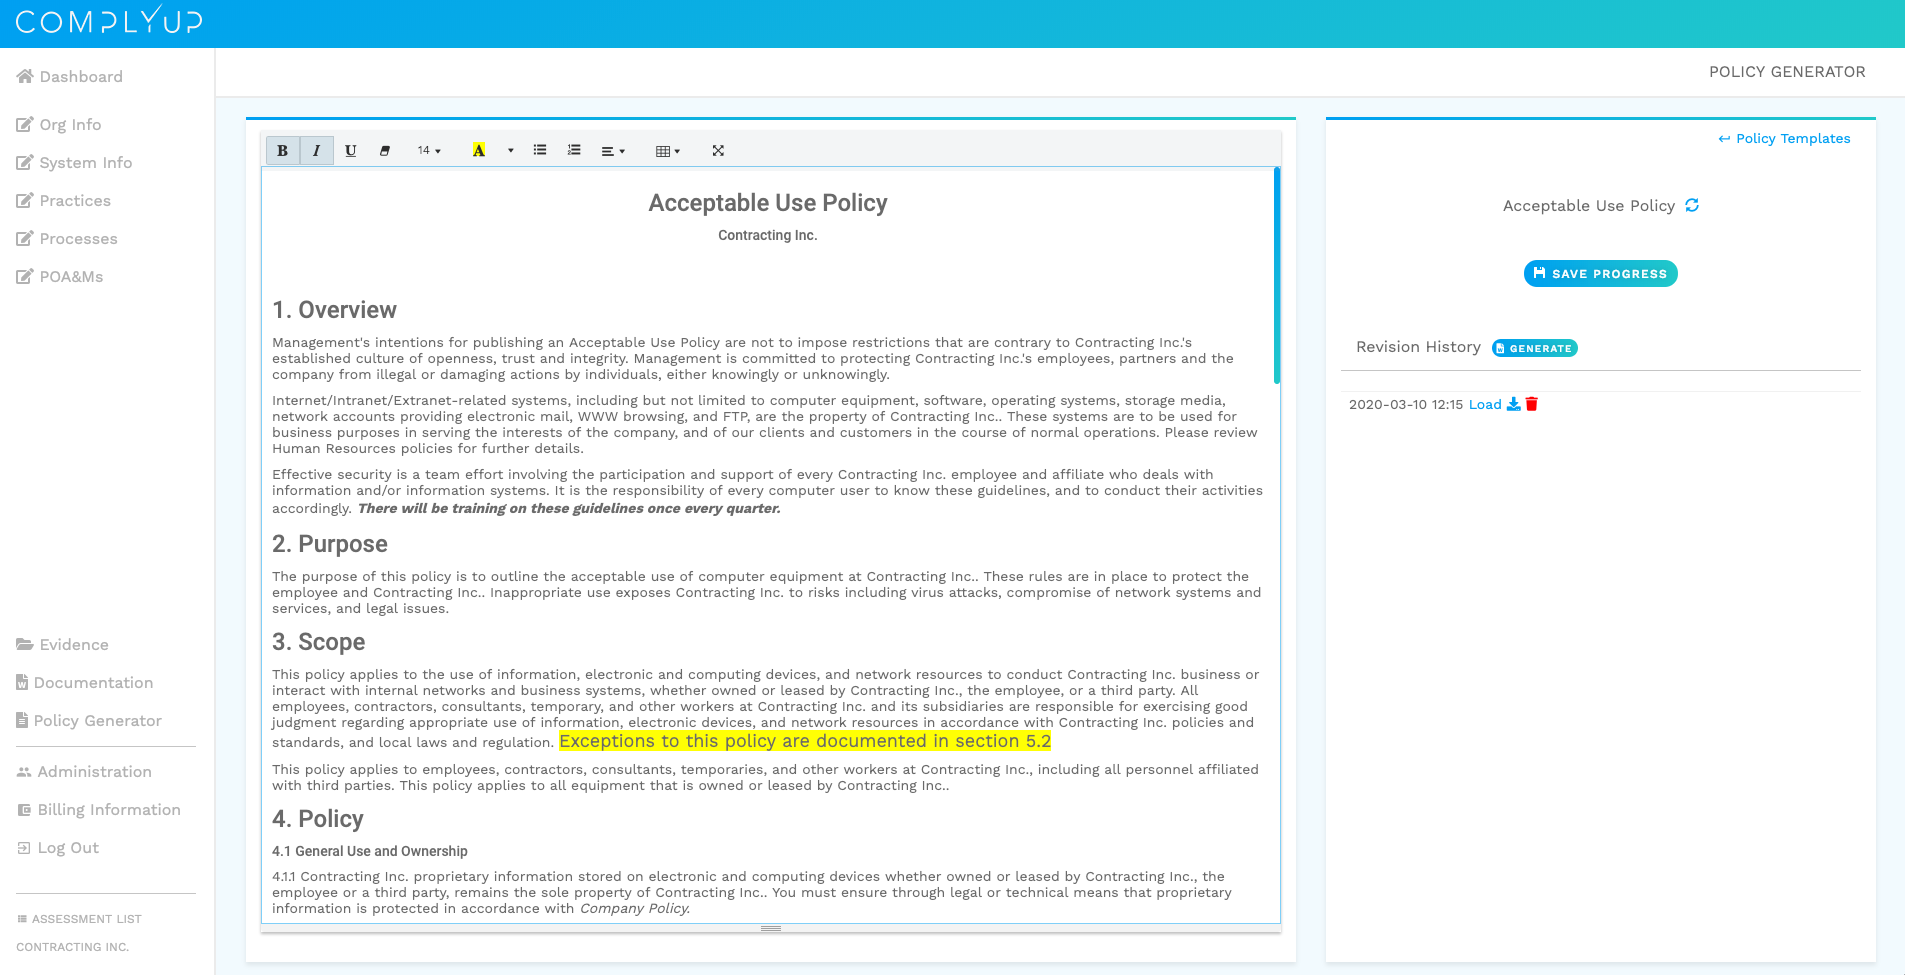
The Policy Generator can be accessed via the tab labeled “Policy Generator” in the Assessment Features (#2) of the Assessment Dashboard. Here you can view, edit, add, download, and associate policies that pertain to your existing platform. The policies can be edited via Text Box.
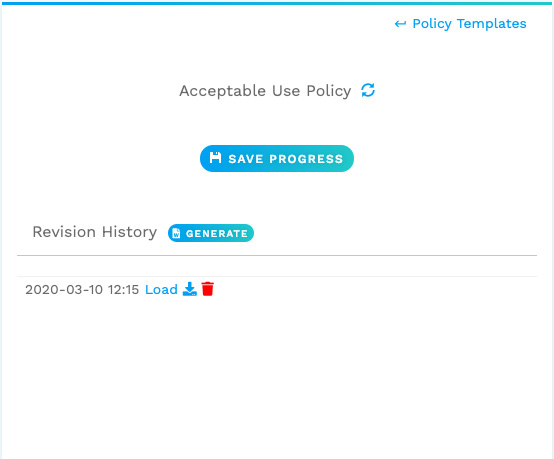
The Save Progress button will save all changes to the current policy to the last loaded version. All future saves will save to this version as well. If it is the first time saving, it will create a Revision History version.
To create a new Revision History version other than the one you have already loaded in, simply click the Generate button. All unsaved changes will be lost.
| This reload button will reset the current policy back to the CU-AP standard. All changes will be lost if not saved. You must confirm reload before action takes place.
Load | Selecting “Load” will load in the policy saved on the date and time to the left. It will load in from the last “Save Progress” that was done at the indicated times.
| The download button will begin a download of the specific saved policy from the date and time to the left.
| The trash button will delete this saved version of the policy.
To return to the list of policy templates that the assessment offers, click the “Policy Templates” link in the top right corner.